How to set up event-based ingestion of files in S3 for free


In my last blog post, I shared several different event-driven architecture patterns for databases and files. In one such pattern, I demonstrated how you can use serverless functions trigger downstream processes when new files are added or modified in object storage.
It’s time to put that pattern to work!
In this blog post, I’ll show you can implement event-driven real-time data ingestion from files using S3 Event Notifications in combination with AWS Lambda to trigger a simple Python script that sends file change events to a downstream service - in this case Tinybird.
{%tip-box title="Why Tinybird?"%}Tinybird is a powerful real-time data platform for data and engineering teams, so it’s a natural place to build and publish stakeholder-facing data products as a part of a large event-driven architecture strategy. Plus, I work here, so it’s easy and obvious.{%tip-box-end%}
Getting started
To follow along with this tutorial, you’ll need an AWS account. We’ll use the AWS Console to complete all of the AWS tasks, but you could also use the AWS CLI if desired.
You’ll also need to set up a Tinybird account - you can get one here for free - where you’ll be prompted to create a new Workspace.
A note on architecture
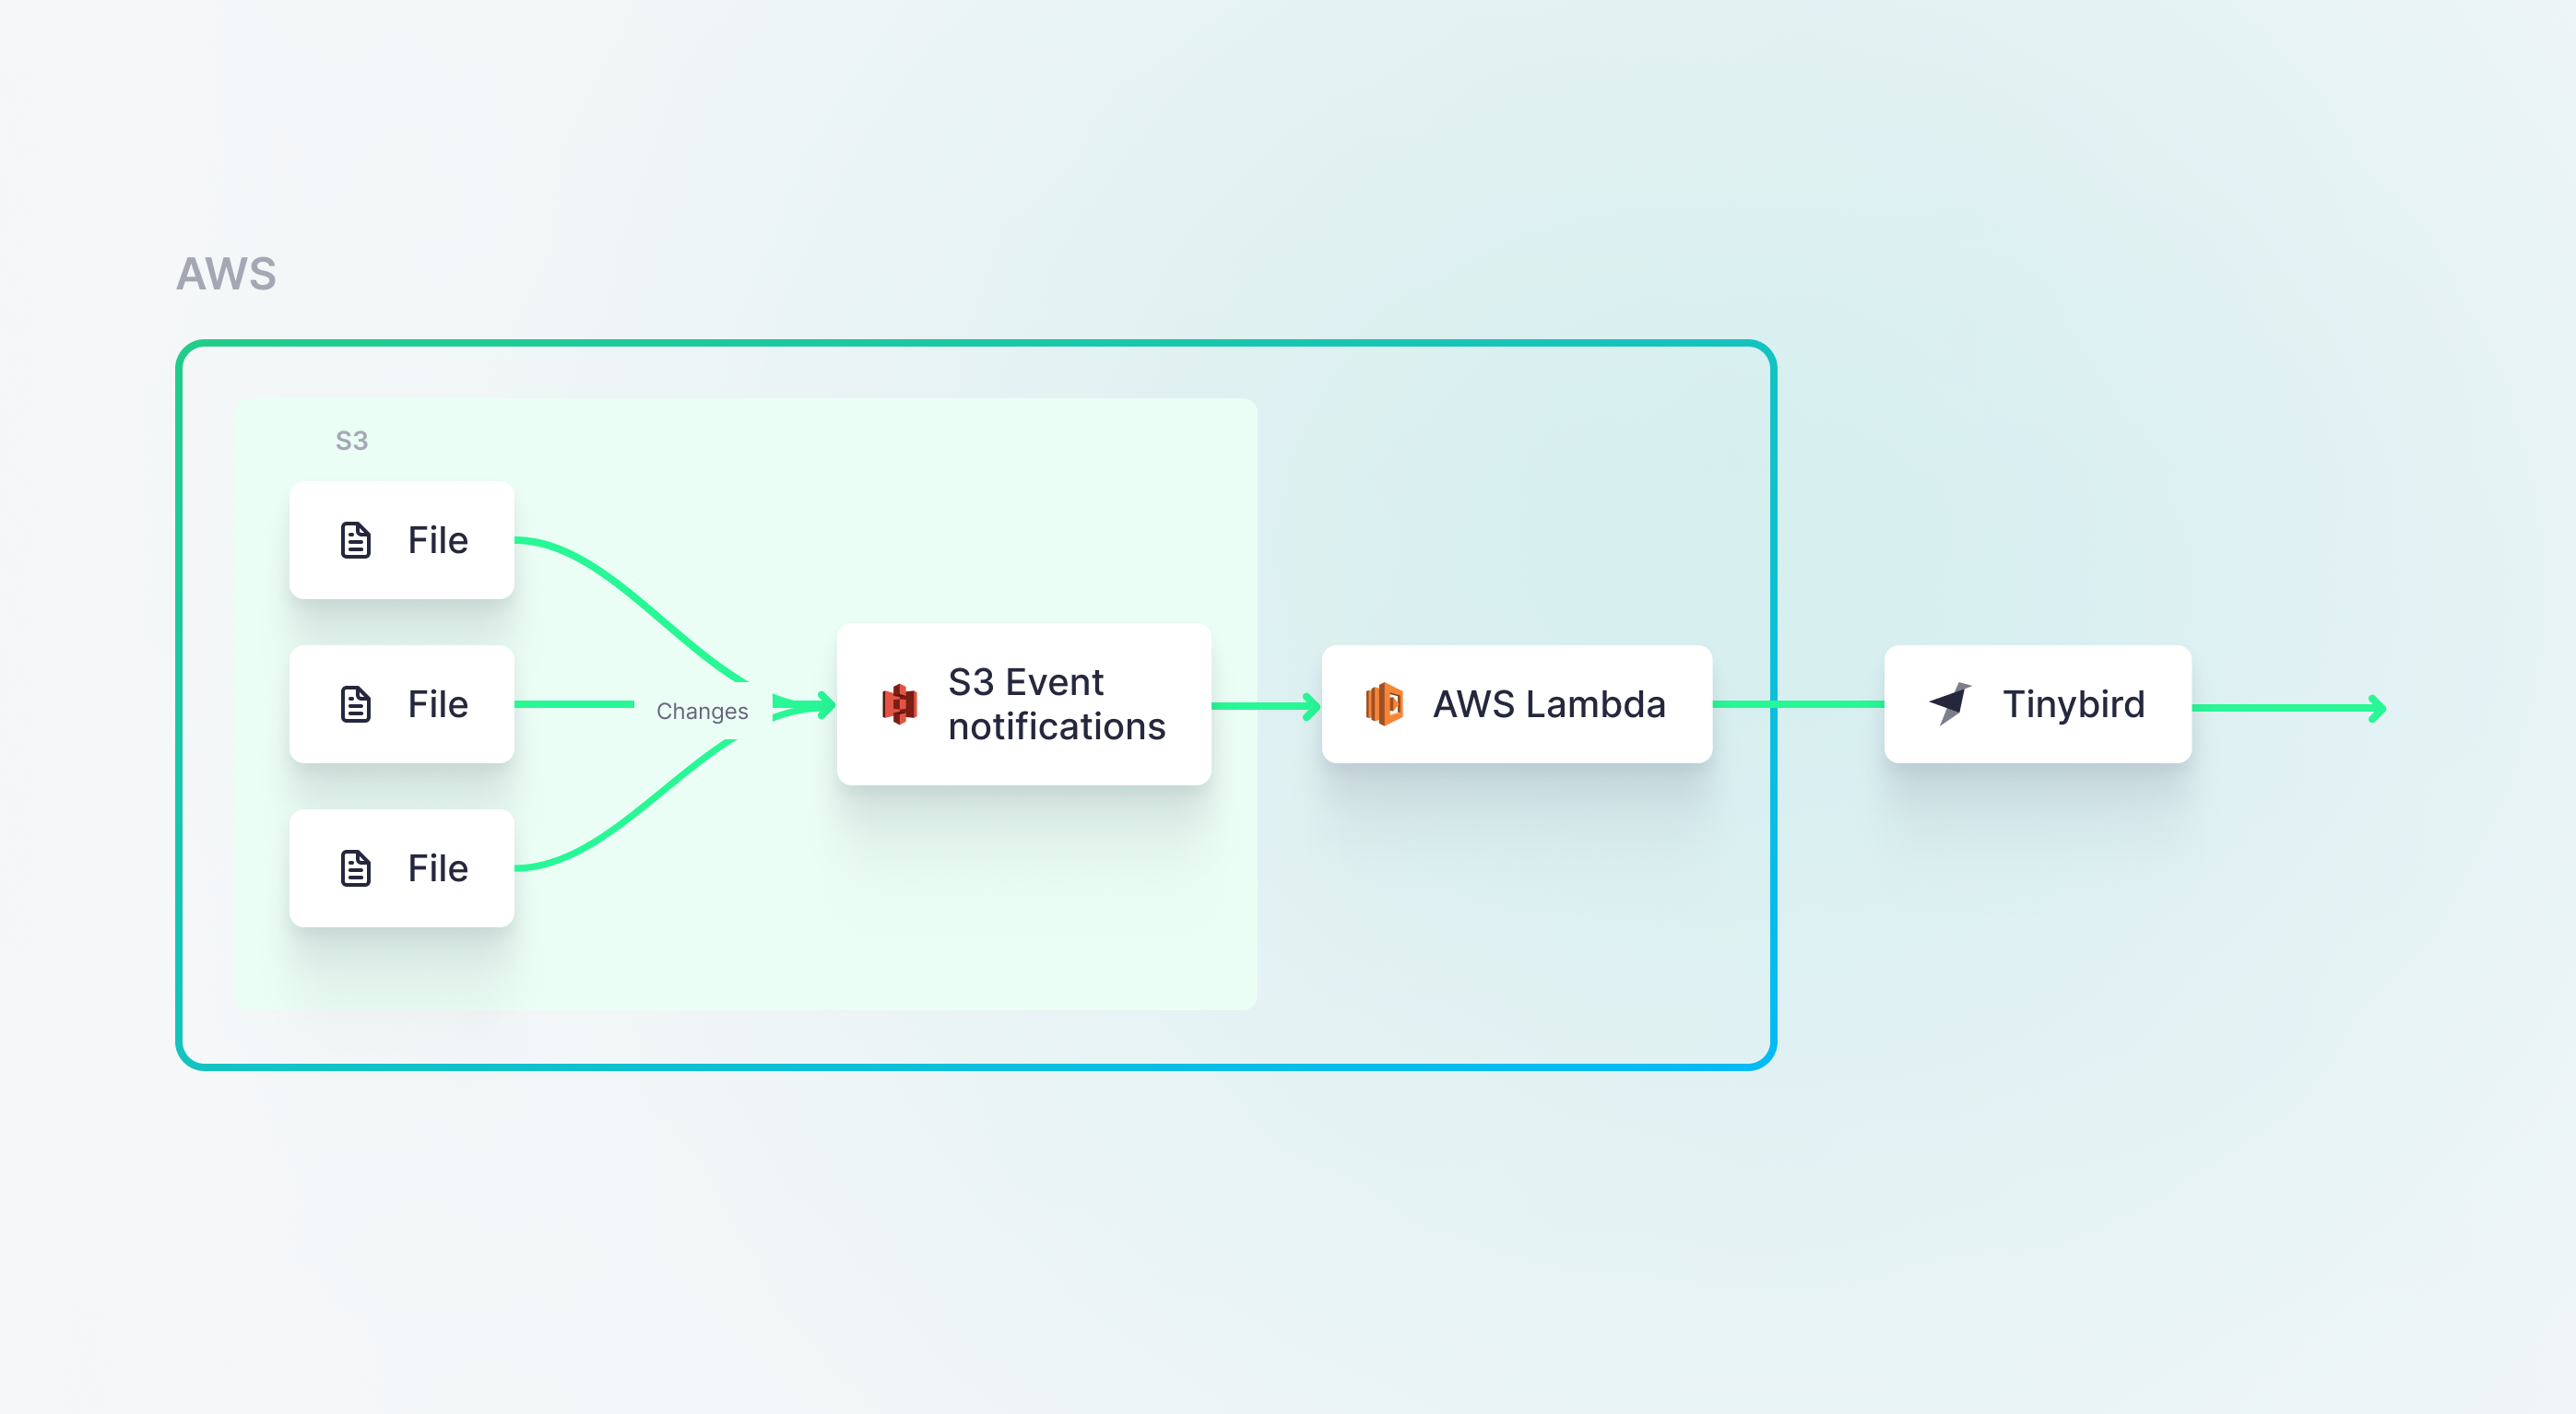
As a I covered in my last post, this is but one of many ways to process changes in source data systems as a part of an event-driven architecture. Here, we’ll use S3 Event Notifications and Lambda to send data to Tinybird:
But, we could just as easily use SNS or SQS and push our events to a message queue where they could be accessed by many downstream consumers, including Lambda (or Tinybird).
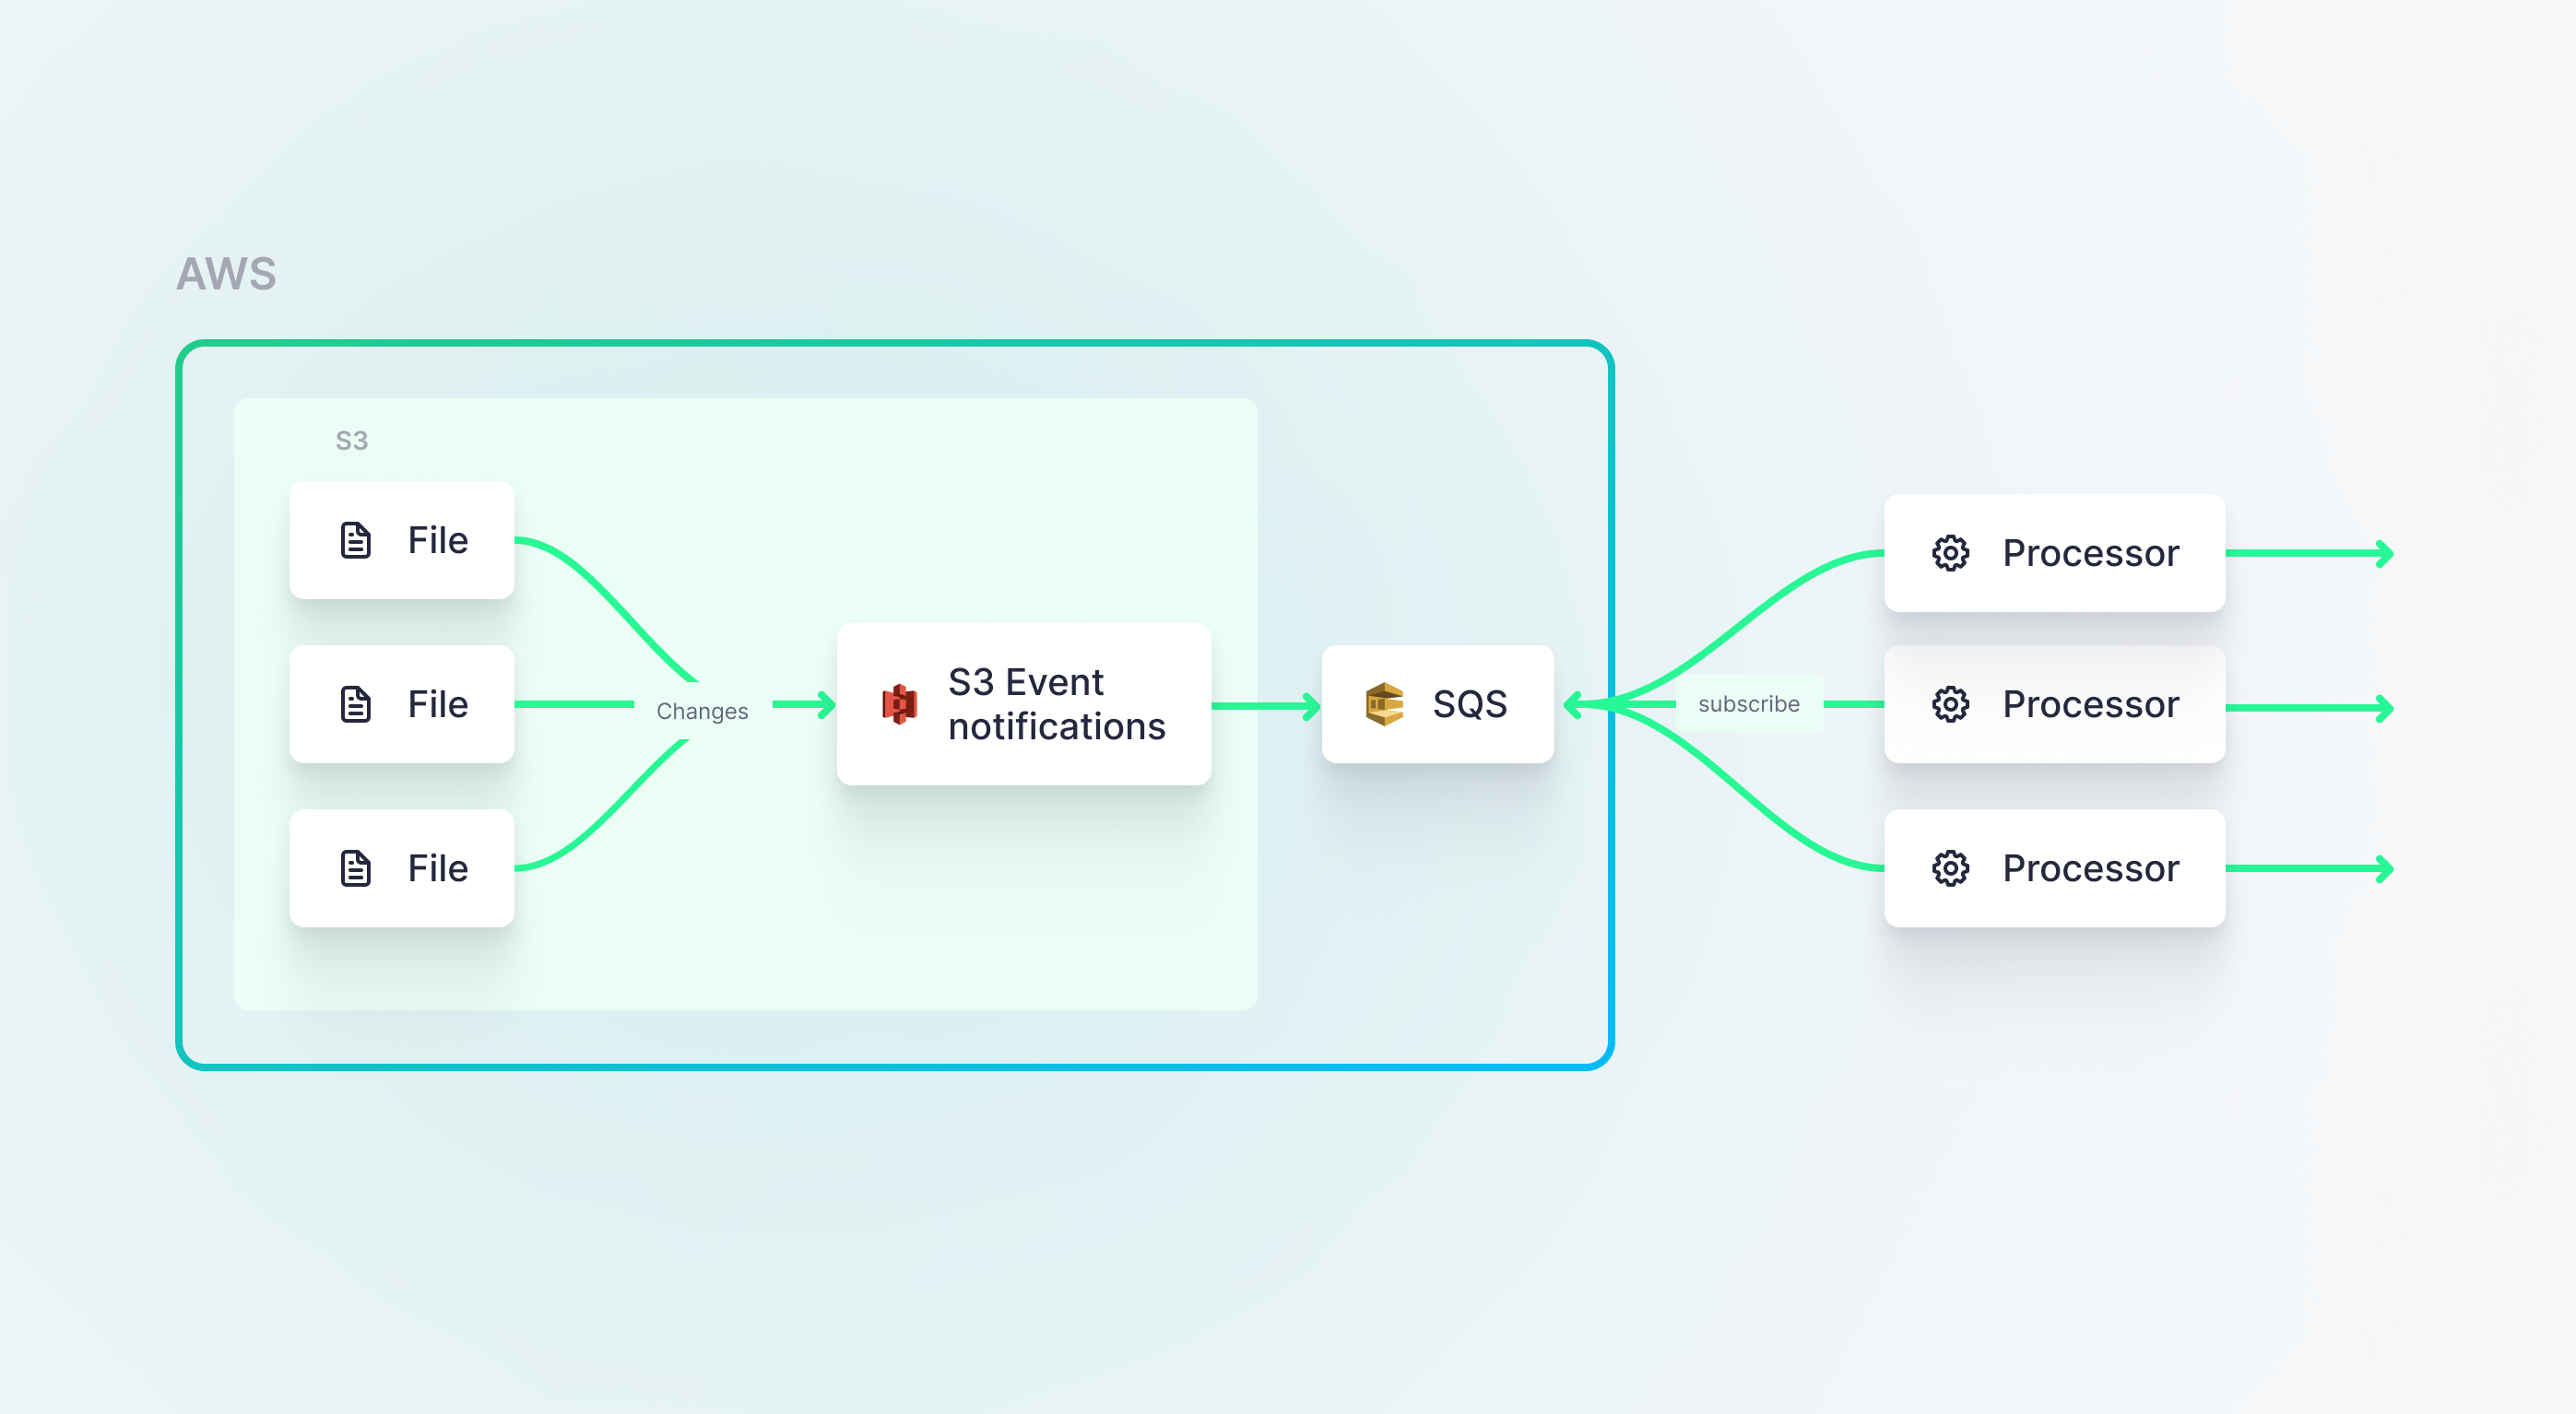
If you’re curious about whether you should or should not use a message queue, read this.
Creating event-driven file ingestion with S3 and Lambda
Step 1: Create an S3 bucket
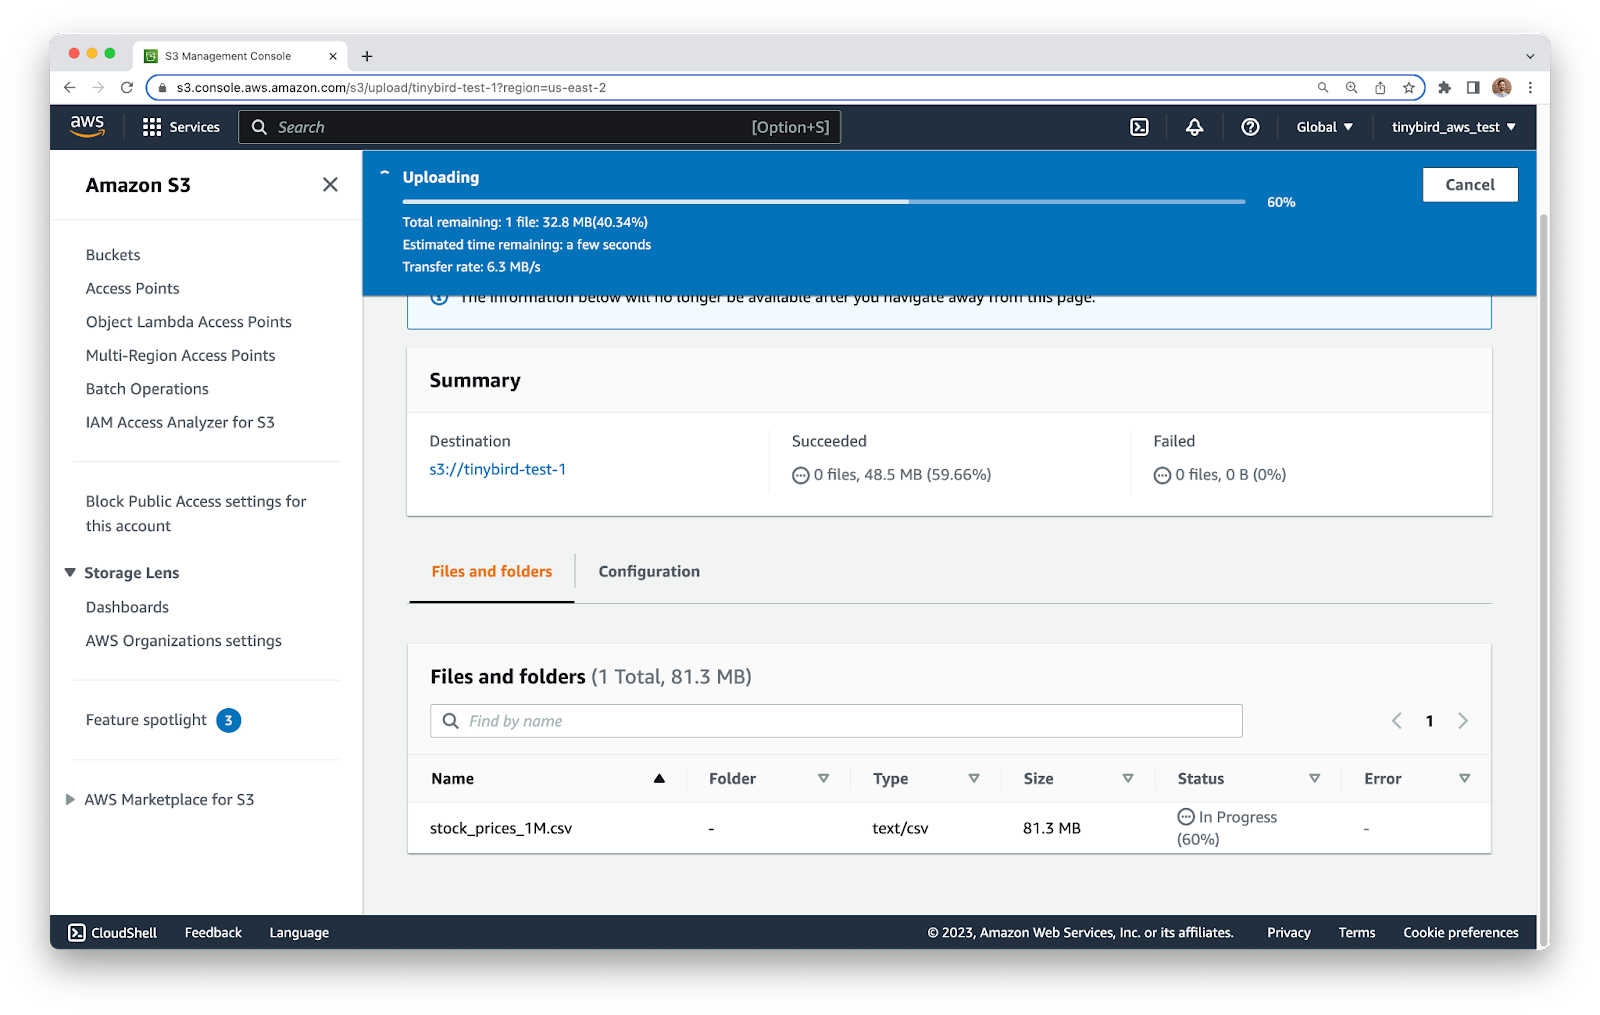
To get started, go to the AWS Console and find the S3 service. Create a new S3 bucket and give it a name. I’m using ``tinybird-test-1`` for this tutorial.
Next, upload a standard CSV file containing some data. If you don’t have one handy, you can use this sample file. Just download it, and then upload it to S3. Make sure the file has the ``.csv`` suffix, as we’ll use this to filter files later on.
Step 2: Create the AWS Lambda function
Reference docs
- https://docs.aws.amazon.com/lambda/latest/dg/with-s3.html
- https://docs.aws.amazon.com/lambda/latest/dg/with-s3-example.html
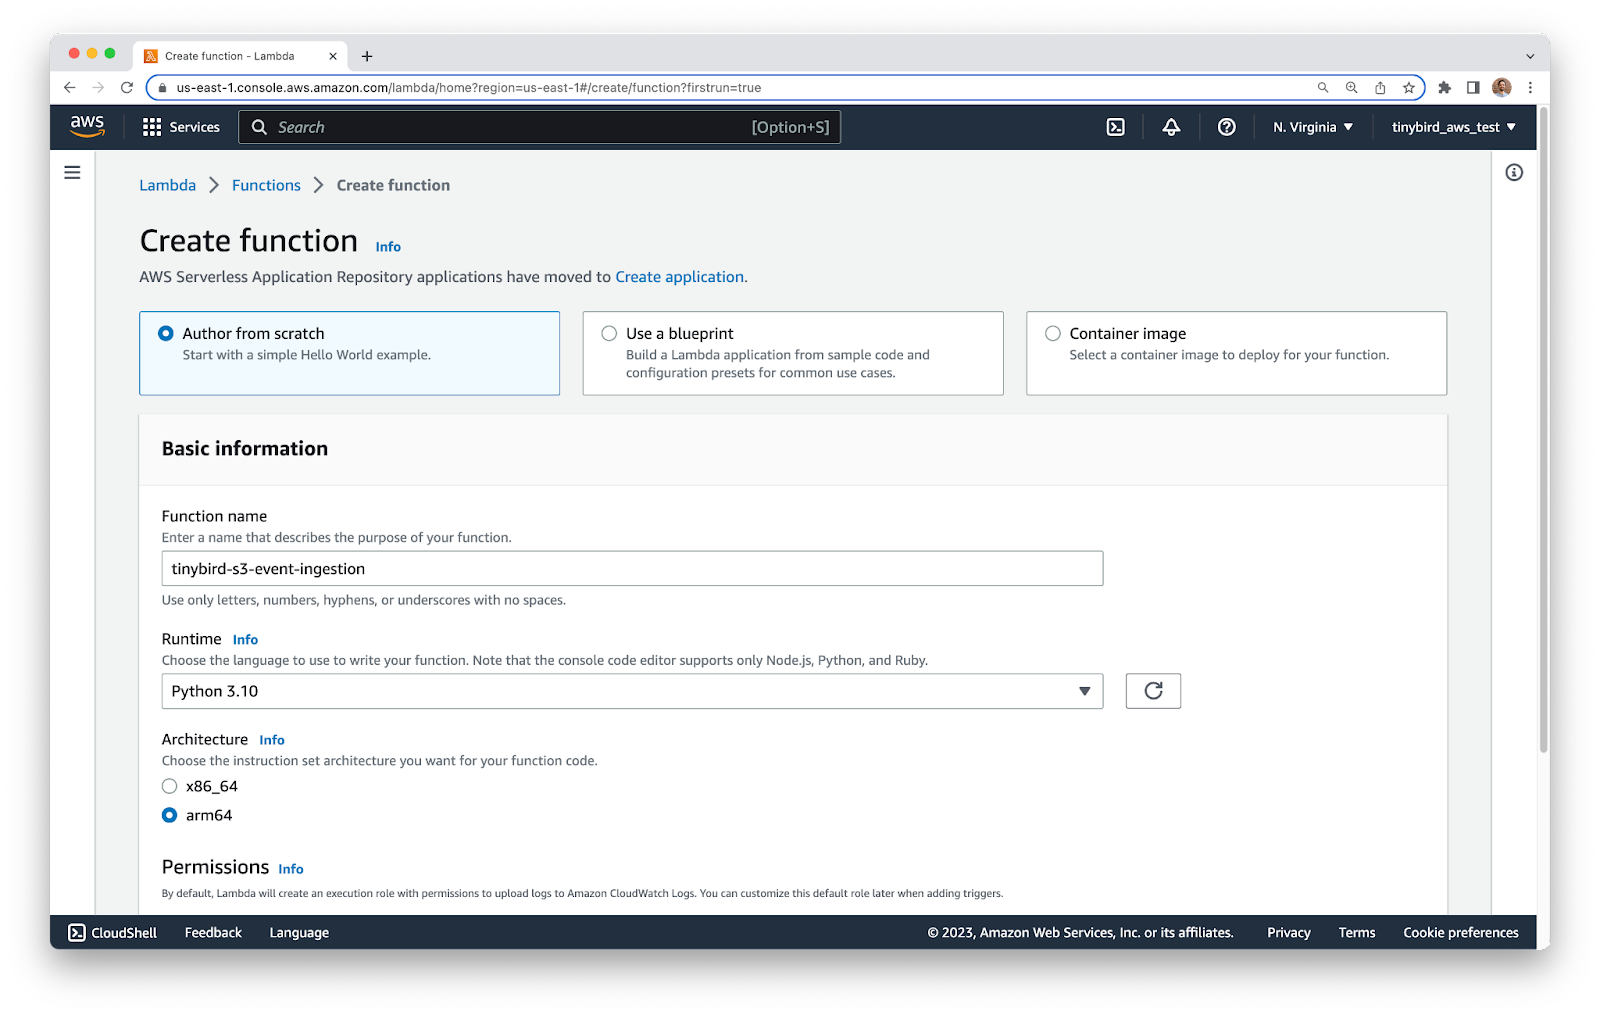
Now, create the AWS Lambda function. Go to the Lambda service, and create a new function. Make sure that you are in the same AWS region as your S3 bucket.
In the function configuration, give your function a name and set the following parameters:
- Runtime: Python 3.10
- Architecture: arm64
- Set the default execution role to Create a new role with basic Lambda permissions
{%tip-box title="Why arm64?"%}Running your function on arm64 is cheaper than x86, and all of the dependencies we need work fine on arm64. If you extend the function with additional logic, make sure any new dependencies are compatible with arm, or switch to x86.{%tip-box-end%}
Click the Create function button to finish.
Step 3: Update the Lambda IAM permissions
When you create the function, a new IAM role will be created for you. This role will have most of the permissions, but it is missing one that we’ll need later on for creating presigned URLs to send the data on to Tinybird.
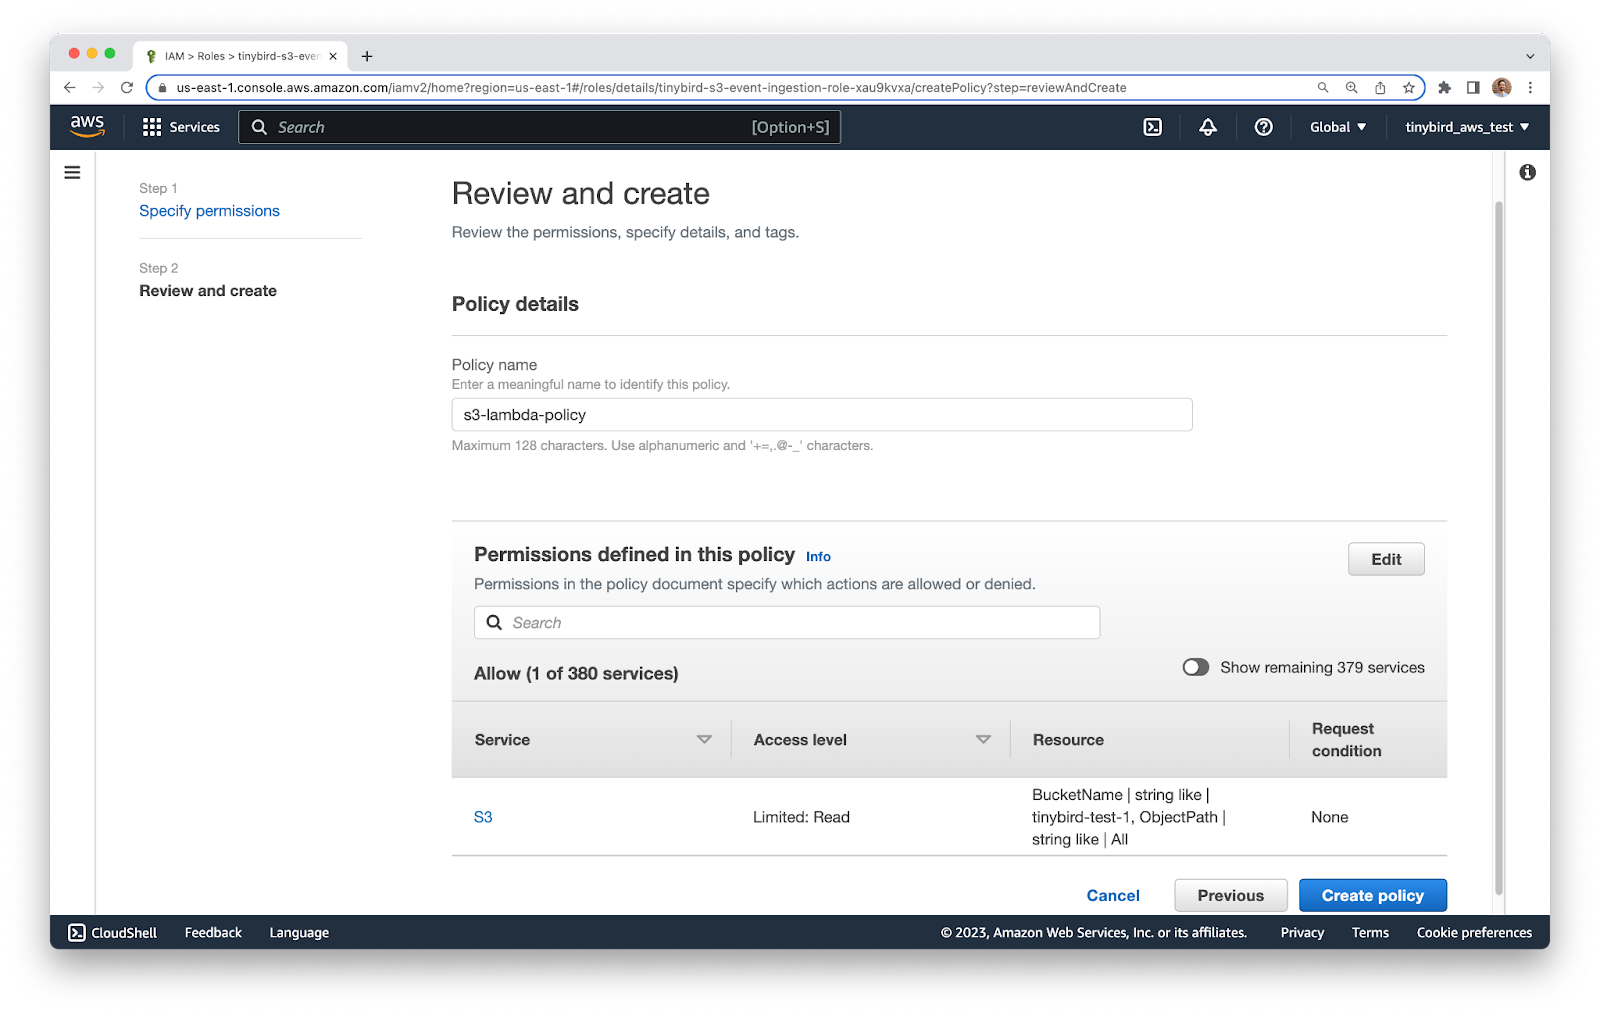
Go to the IAM service, find the Roles tab, and look for the new role that was created for your Lambda. By default, the naming convention is ``<function_name>_role_<random_chars>``. You can order the list by the ``Last Activity`` column and your role should come to the top. In my case, the role was called ``tinybird-s3-event-ingestion-role-xau9kvxa``.

Click into the role and select the Permissions tab. Click the ``Add permissions`` button and select ``Create inline policy``. Switch to the ``JSON`` tab, and paste the following JSON into the text box. Make sure to modify the value of the ``Resource`` option, replacing ``tinybird-test-1`` with the name of your own bucket.
Give the policy a name, and then click Create Policy.
Step 4: Start writing your AWS Lambda code
If you wish, you can write code in your own editor, but AWS has a decent code editor available inside the AWS Console which is fine for the small amount of code you’ll be writing.
Return to the Lambda service, and click into your new Lambda function. Scroll down to the Code view.
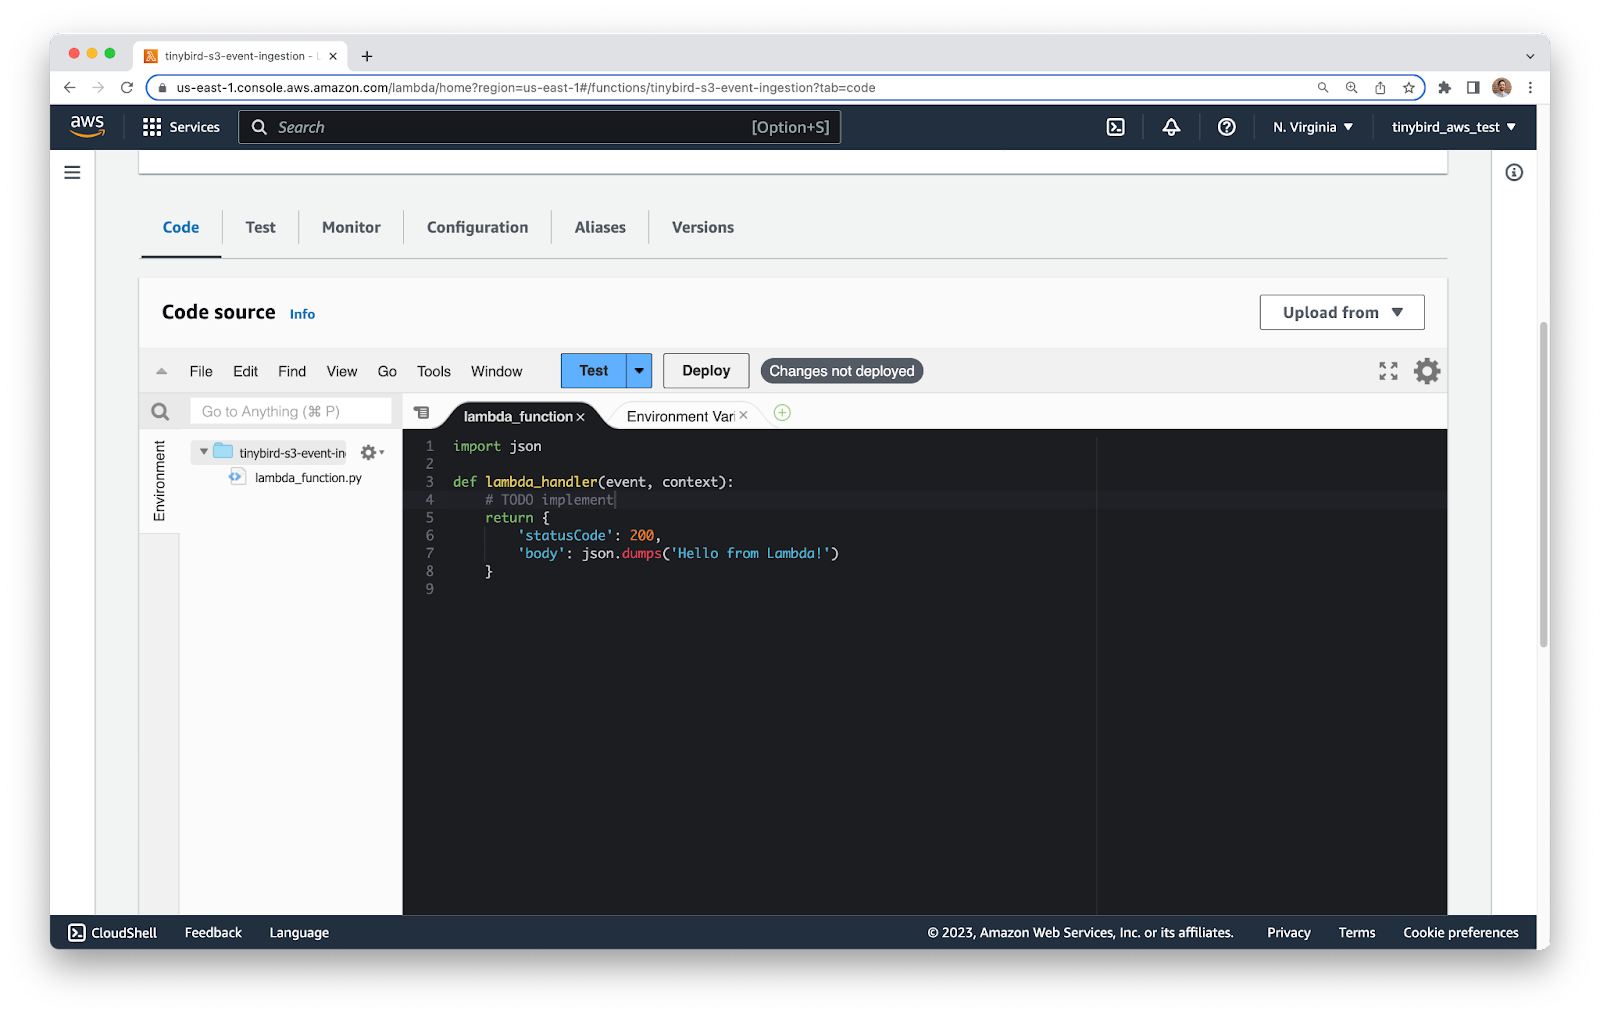
The code contains some default boilerplate that you’ll extend. Inside the existing ``lambda_handler`` function, add a quick ``print(event)`` line so you can see what the incoming event looks like. Your code will look like this:
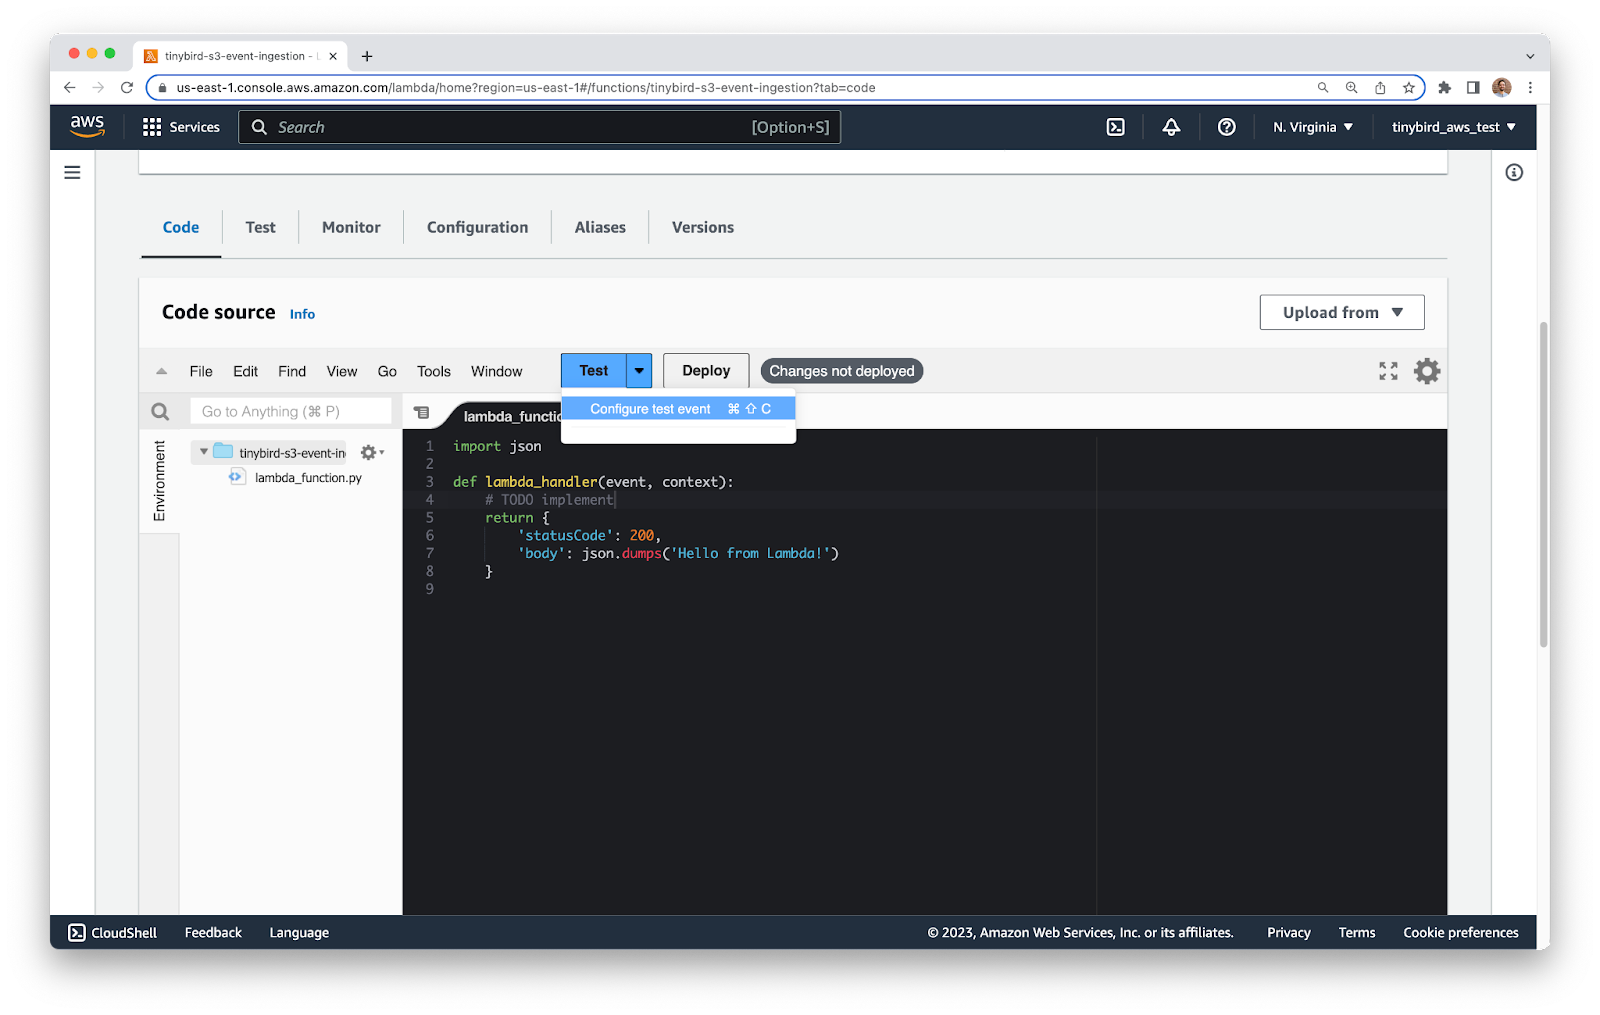
Now you’ll configure a test event so that you can run your code as you make changes, and the incoming event will accurately represent an S3 Event Notification event.
In the editor, click the dropdown arrow next to the Test button, select the Configure test event option.
You’ll see a configuration screen. Configure a name, select Private for Event sharing settings, and for the Template select ``s3-put``. Before you save, you’ll need to modify the event.
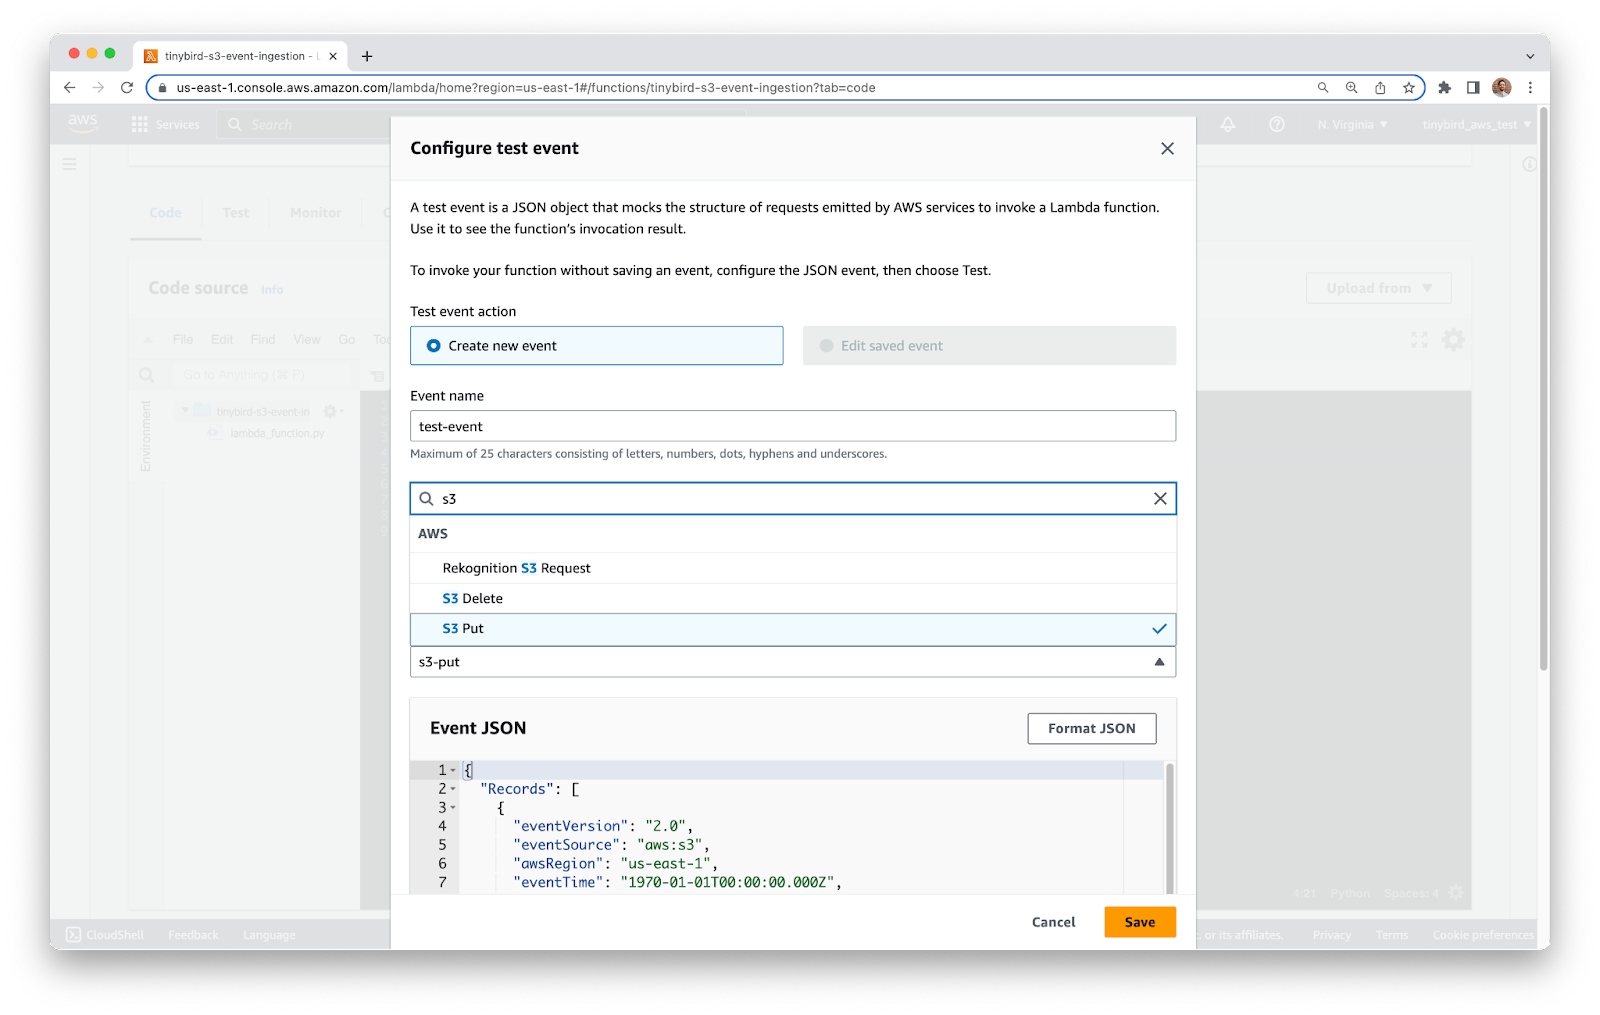
Inside the JSON, update bucket name, arn, and object key to match your own resources (You may also need to update your region). The three fields are ``s3.bucket.name``, ``s3.bucket.arn`` and ``s3.object.key``, towards the bottom of the JSON.
In my case, the fields have the following values:
Your test event should look like the example below. Click Save when you’re done.
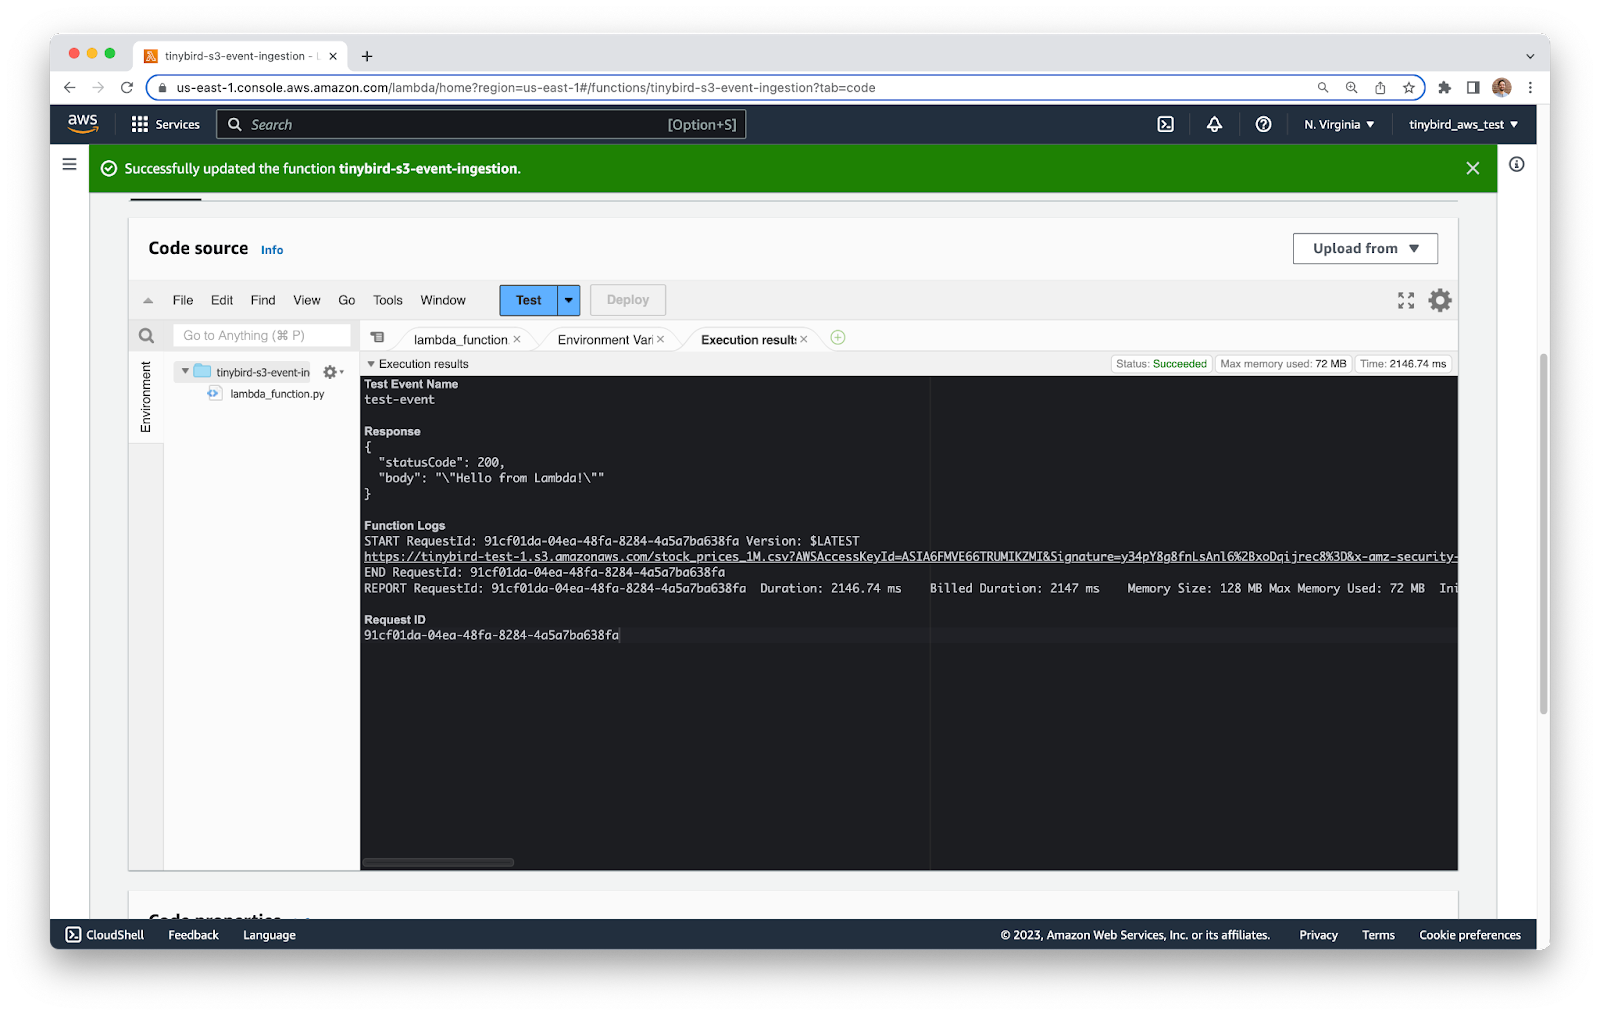
Back to the editor, save your file and click ``Deploy``. Notice that there is a bar at the top of the screen that gives the status of your deployment. When it turns green and says that your deployment is successful (it should only take a second) you can click ``Test``.
A new tab in the editor will open to show you the execution results of your Lambda. You should see the test event printed towards the bottom under Function Logs.
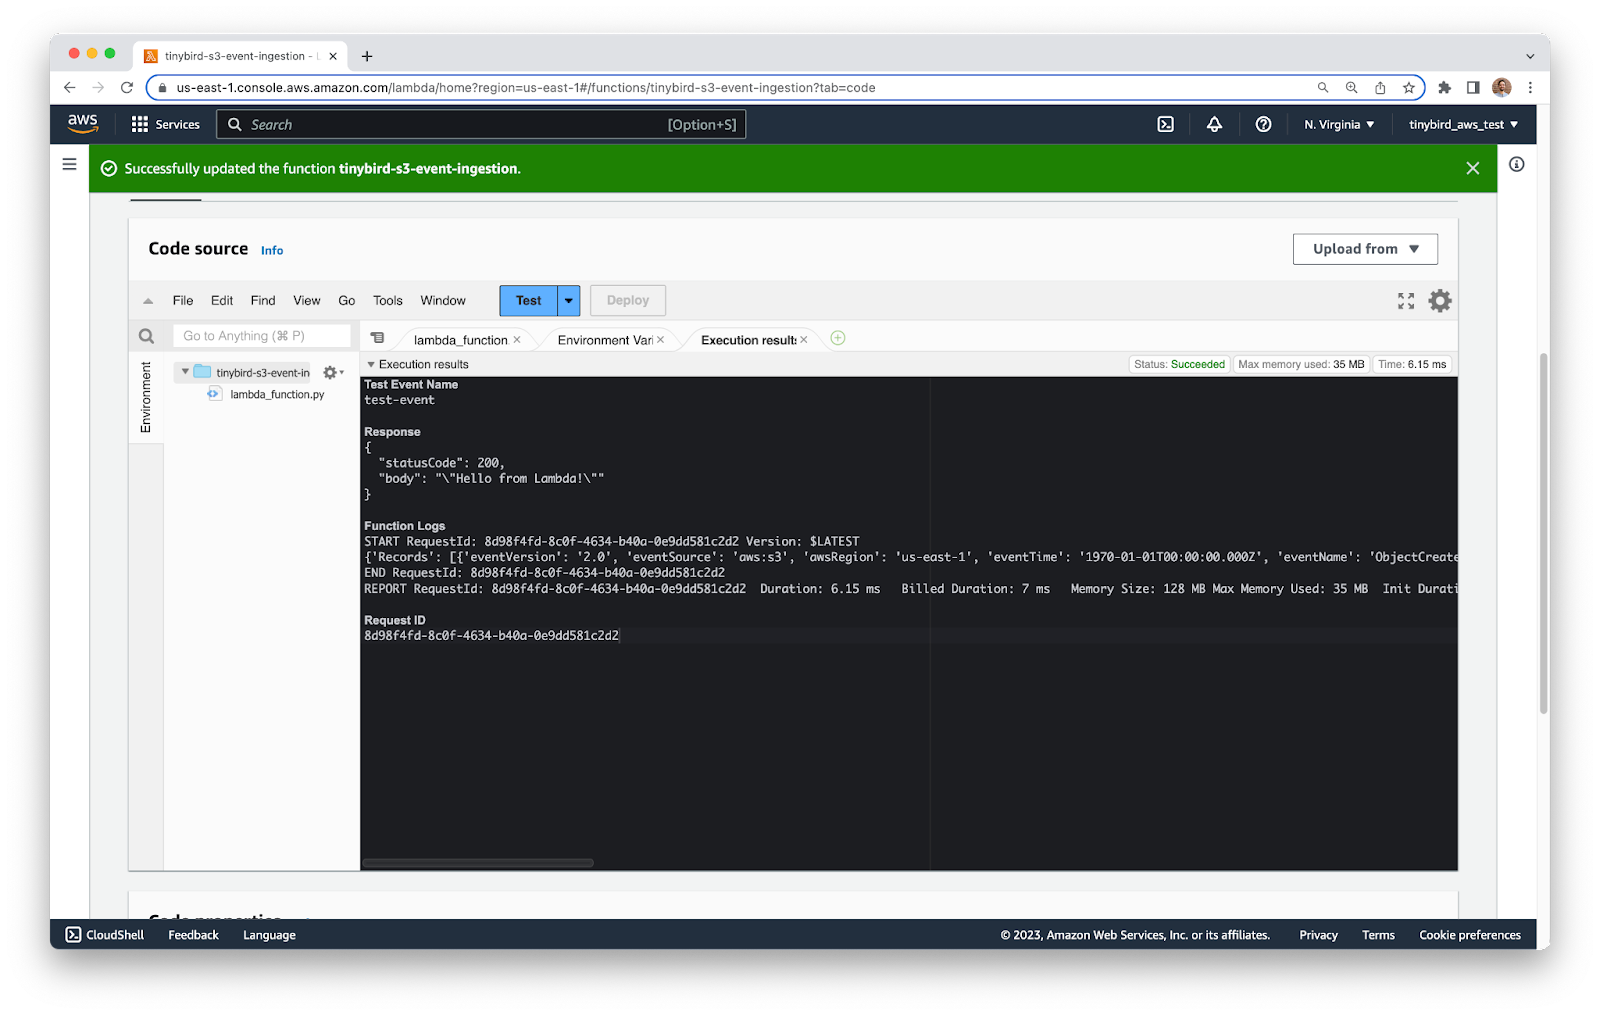
For this tutorial, you only need 2 fields from the event: the Bucket name and Object Key. However, there are a lot of other fields in this event that you might want to use to make your function more intelligent.
In JSONPath notation you can find the two fields you need at ``$.Records[0].s3.bucket.name`` for the Bucket name, and ``$.Records[0].s3.object.key`` for the Object Key. These two fields are enough for you to find the file in S3 later on.
Update your code to extract those two fields, and remove the ``print``.
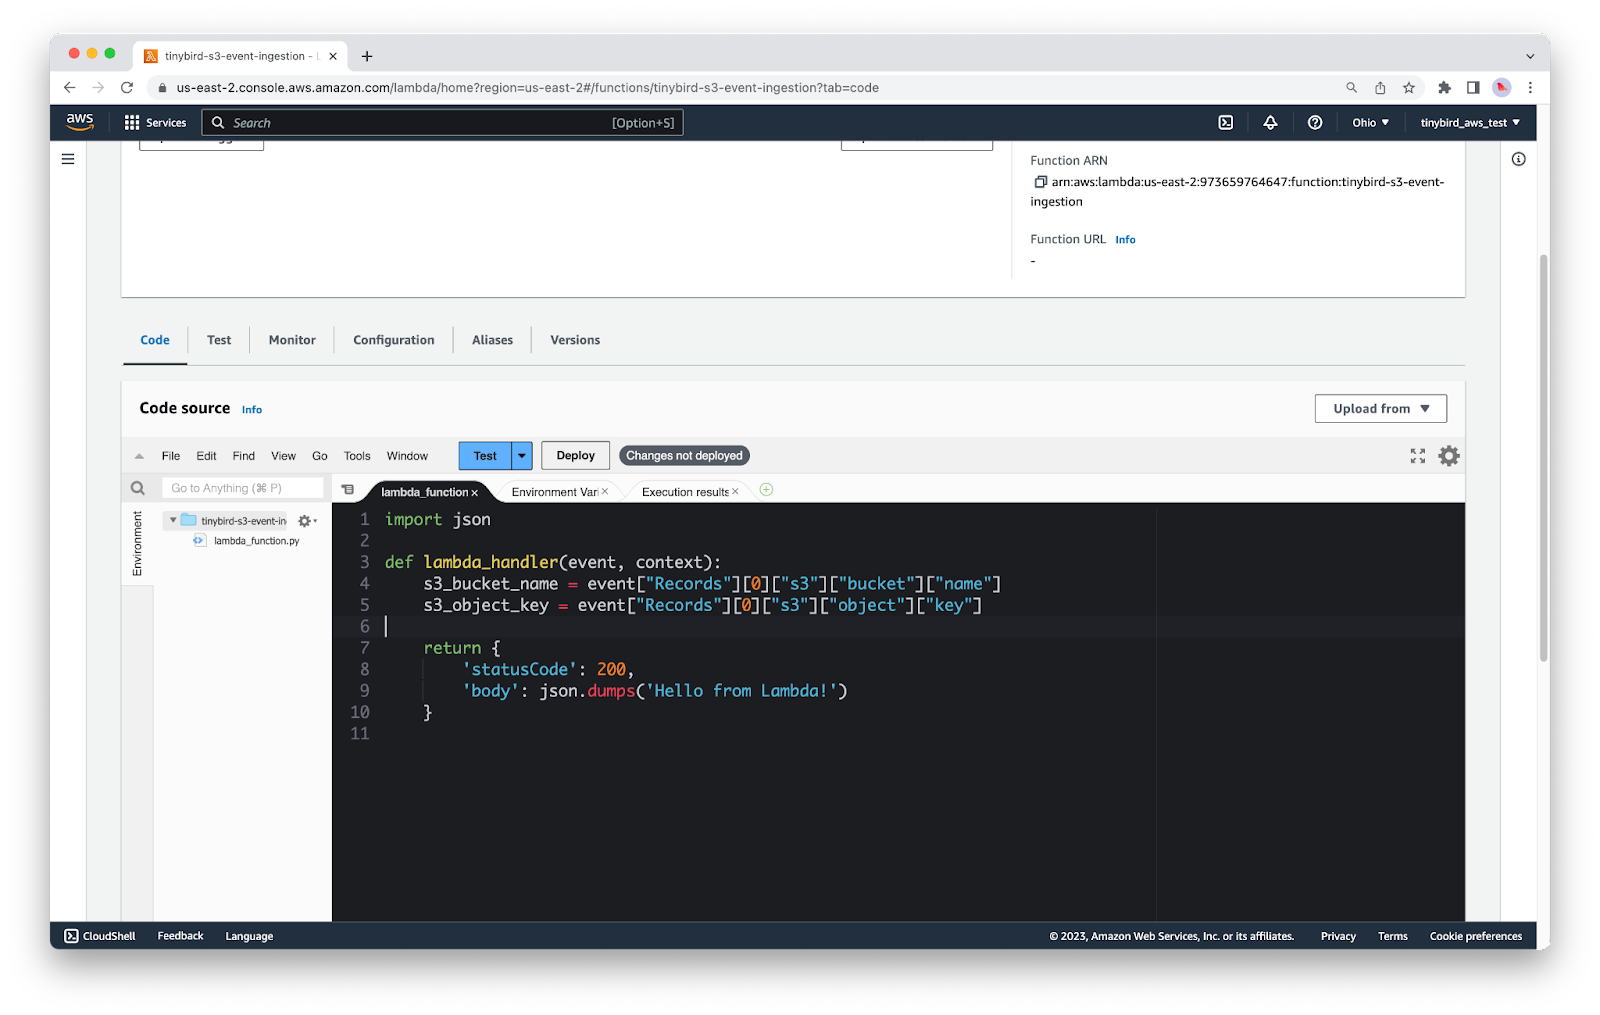
You now have two variables that contain the details you need to find the newly uploaded object in S3.
At this point, what you do next depends on what you want to do with the file. In this tutorial, I’ll show you how you can use this information to create presigned URLs and push files to Tinybird’s Datasource API.
Step 5: Use Boto3 to create presigned URLs
Reference docs
You’re going to use the details from your event to create a presigned URL that lets you publicly share the uploaded file outside of AWS. Anyone with the URL will be able to download the file, so be careful what you do with it.
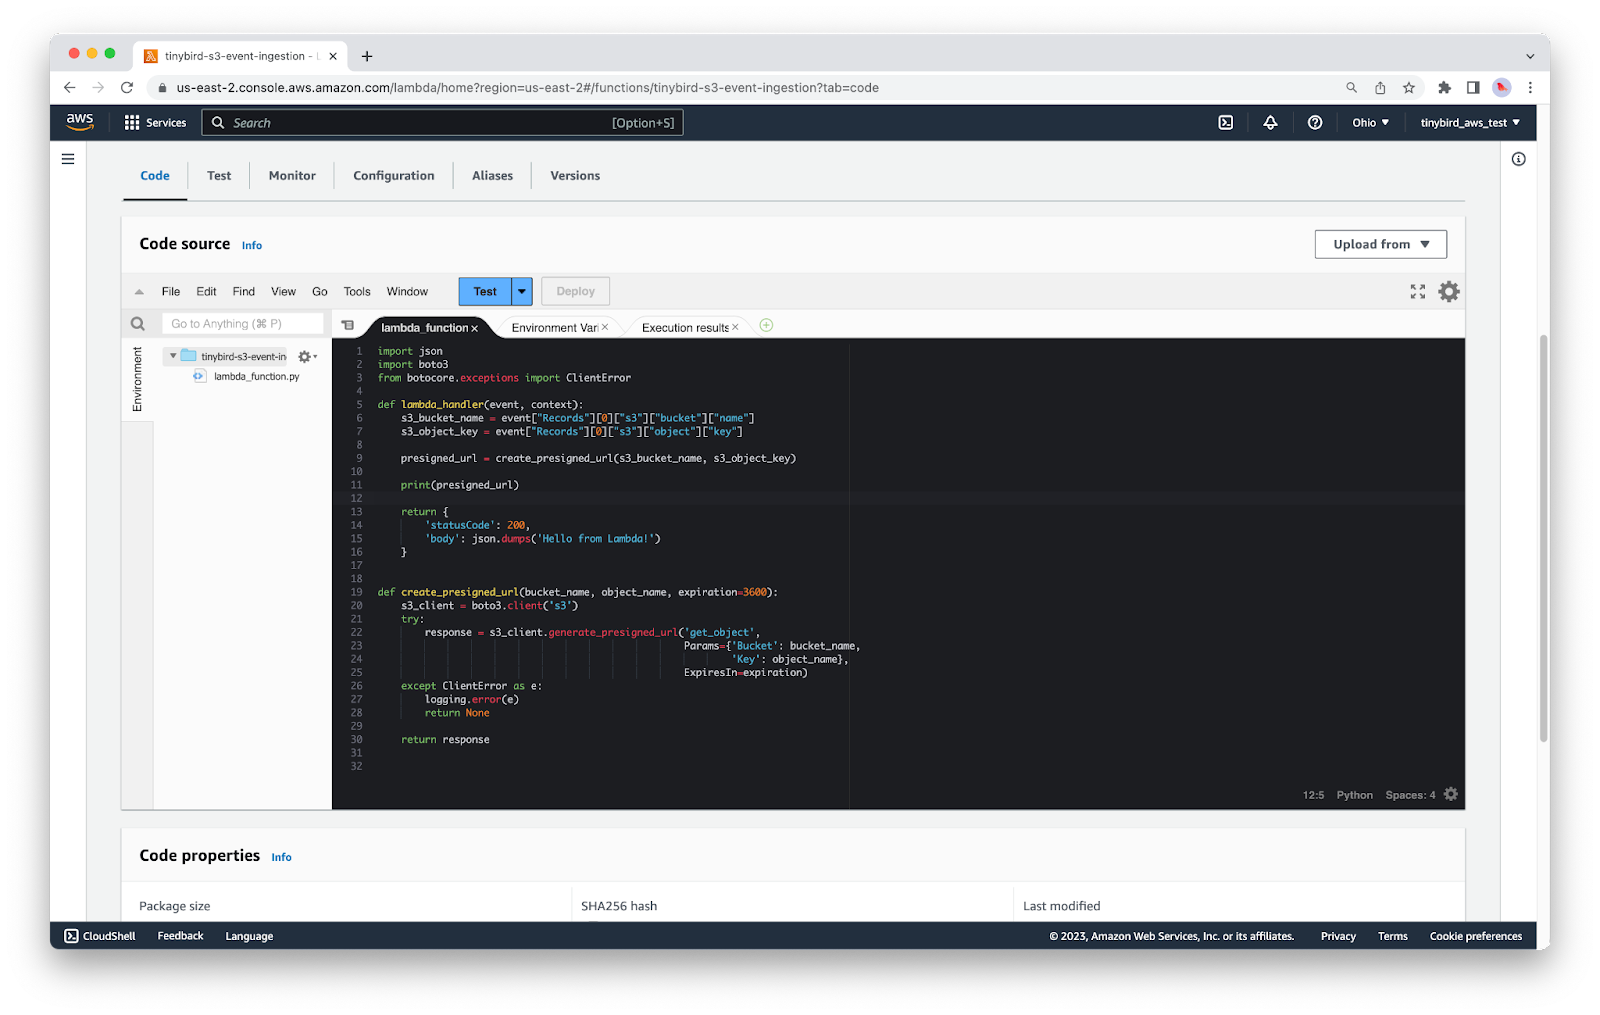
To do this programmatically, you’ll use the boto3 package, which is included by default with the Lambda Python runtime. Start by adding two new lines at the top of the file to import boto3:
Now, create a new function called ``create_presigned_url`` which accepts parameters for the Bucket name and Object Key. In this function, you’ll create a new S3 client, and then use the ``generate_presigned_url`` method to create your presigned URL, passing it the name of your Bucket and Object Key. That’s really all there is to it, and you can simply return the generated URL to the function caller.
In the main handler function, you’ll call the new ``create_presigned_url`` function and store the URL in a variable called ``presigned_url``. You can test that this works with a quick ``print(presigned_url)``.
Save the file, click Deploy, and then Test. You should see the URL printed in the output.
Copy and paste the URL into a new tab in your browser and you should be able to see/download the file you uploaded.
You now have a presigned URL that can be shared with other people & services. You can send this URL to Tinybird’s /datasources API to ingest the file in Tinybird, allowing us to run SQL queries over the data and build scalable API.
{%tip-box title="Get a Tinybird Account"%}Reminder, you’ll need a Tinybird account for this next part. You can get one for free (with no time limit), here.{%tip-box-end%}
Step 6: Send the presigned URL to Tinybird
Reference docs
- https://www.tinybird.co/docs/guides/ingest-from-amazon-s3.html
- https://urllib3.readthedocs.io/en/latest/user-guide.html#making-requests
With the presigned URL handy, you can send it to Tinybird with a simple POST request to the /datasources API. The Ingest from S3 guide has additional information about building this step.
{%tip-box title="urllib3"%}Unfortunately, the AWS Lambda Python runtime no longer bundles the brilliant ``requests`` library, and it has been removed from the ``botocore.vendored`` package. You can of course upload dependencies, but in this case, we’ll just revert back to old faithful ``urllib3``.{%tip-box-end%}
At the top of your code, add a new import for ``urllib3``.
Now you can create a new function called ``send_to_tinybird`` that executes the HTTP POST request to the Tinybird API. We must set the HTTP ``Authorization`` header to use a Bearer token, and the value must be an Auth Token with the ``DATASOURCE:CREATE`` scope from your Tinybird Workspace.
Note that, in this example, I am simply pasting the value of our Auth Token into the code (as it’s a throwaway), but you should consider storing Auth Token as secrets. For testing, include a ``print(r.status)`` at the end of this function to print the HTTP status code returned from the Tinybird API.
Also bear in mind that if you created your Tinybird Workspace is the ``US-East`` region, you’ll need to update your API url to ``https://api.us-east.tinybird.co/v0/datasources``.
Finally, update the main handler function to call the new ``send_to_tinybird`` function, passing the presigned URL as a parameter.
The core logic of your Lambda function is now complete! If you want to expand on error handling and retry logic before going into production, you can find a more complete example in this GitHub repo.
Step 7: Configure S3 Event Notifications
To close things out, you need to configure the S3 Event Notifications on your bucket to trigger your Lambda whenever a new file is created in S3.
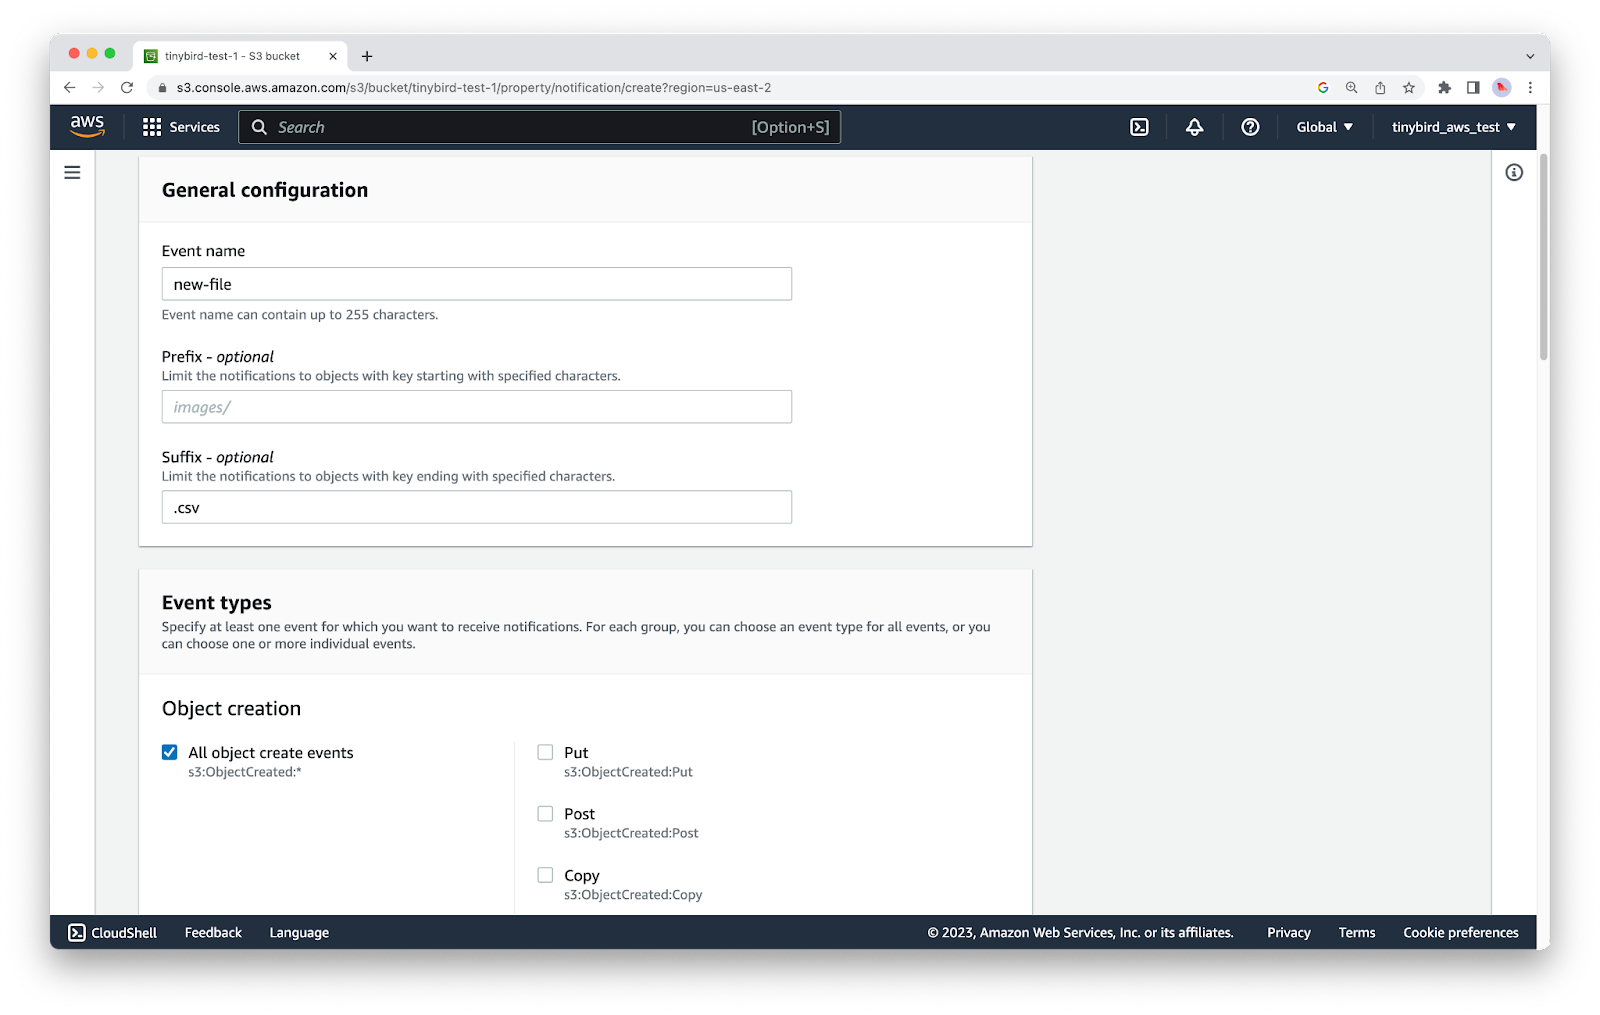
Go to the S3 service, click into your S3 bucket and find the Properties tab. Scroll down and find the Event notifications section. Click Create event notification.
Give your event notification a name, and then configure ``suffix`` with the value ``.csv``. This means that the Lambda will only trigger on files where the filename ends with ``.csv``.
You can extend your Lambda to parse the Object Key and determine the file extension at runtime, adjusting the logic as required to handle multiple file types. For Event types, tick the All object create events option.
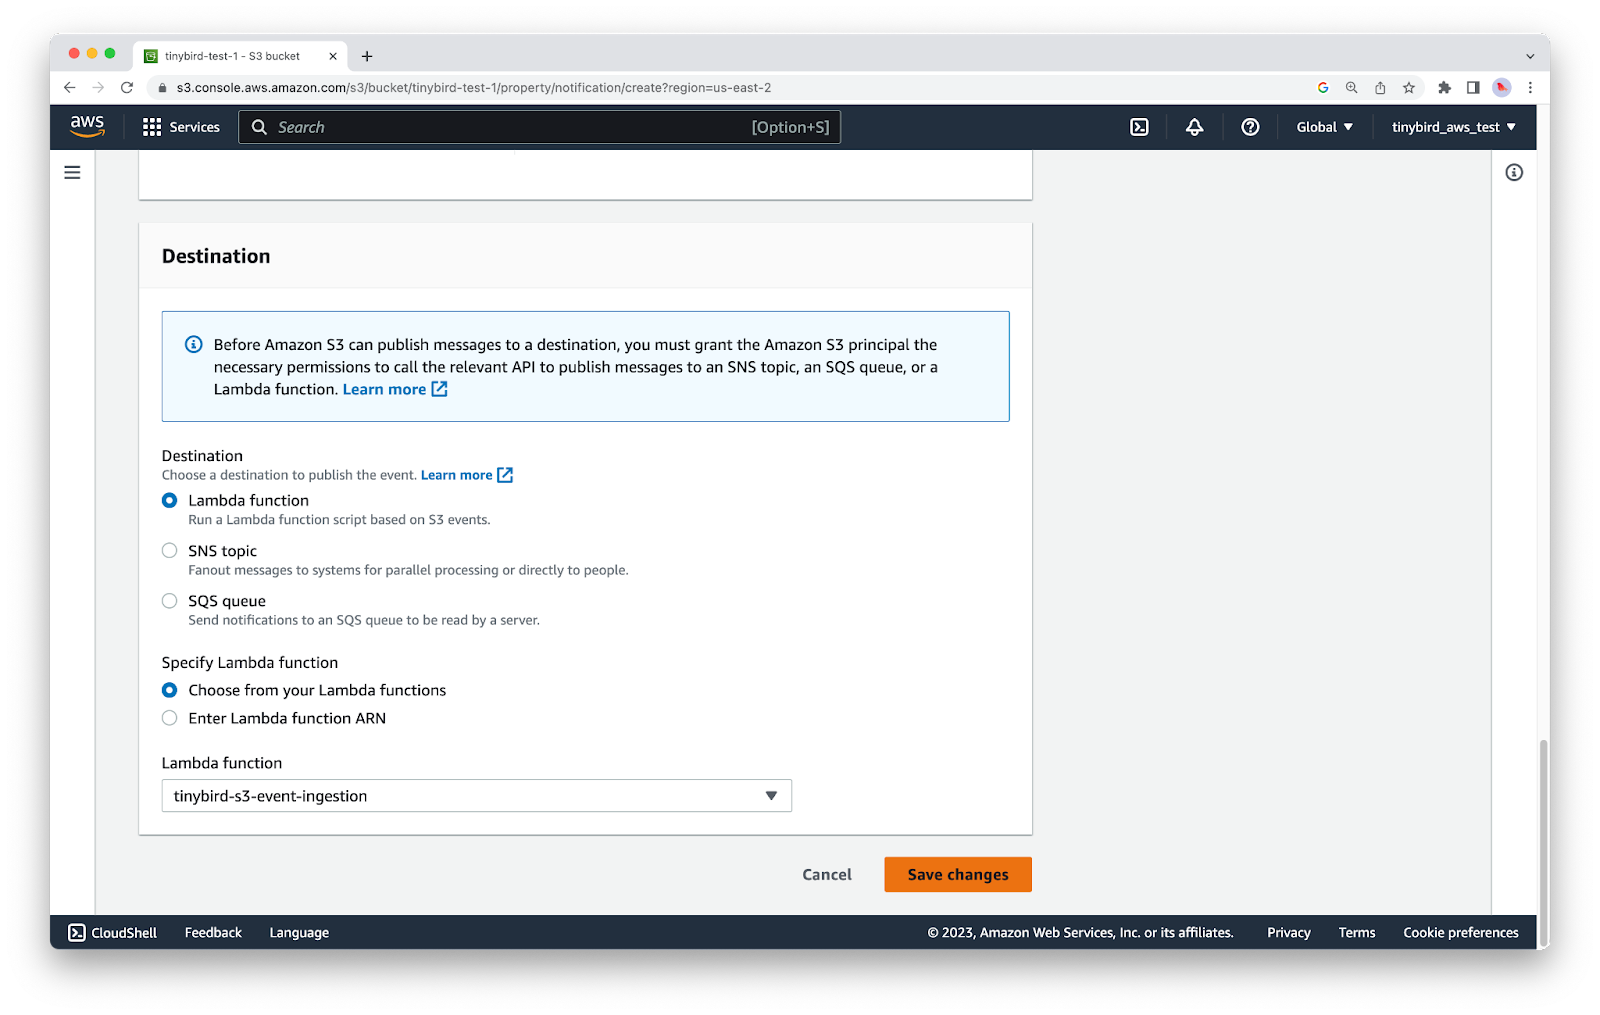
At the bottom of this screen, select Lambda function as the Destination, and then select your Lambda function from the drop down menu. Finally, click Save changes.
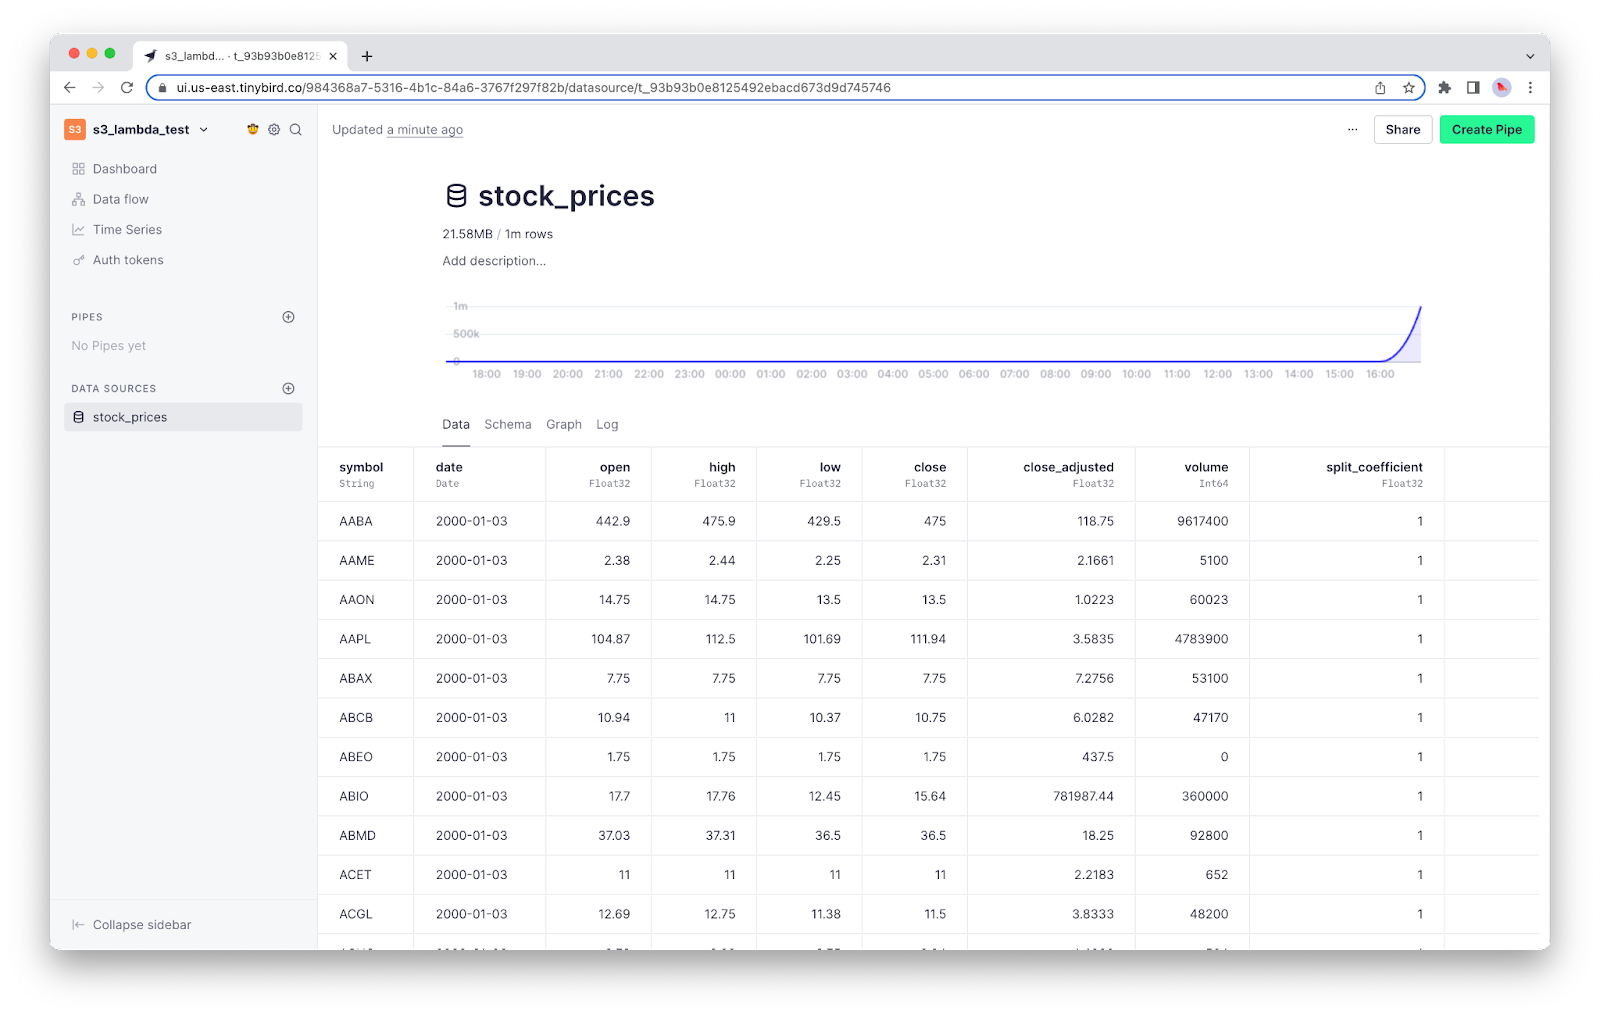
Return to your S3 bucket and upload a new file with a name that ends in ``.csv``.
Your Lambda function will trigger automatically. If you included the code to send the CSV to Tinybird, you can go to the Tinybird UI and you’ll find that it has created a new Data Source with the contents of your CSV file.
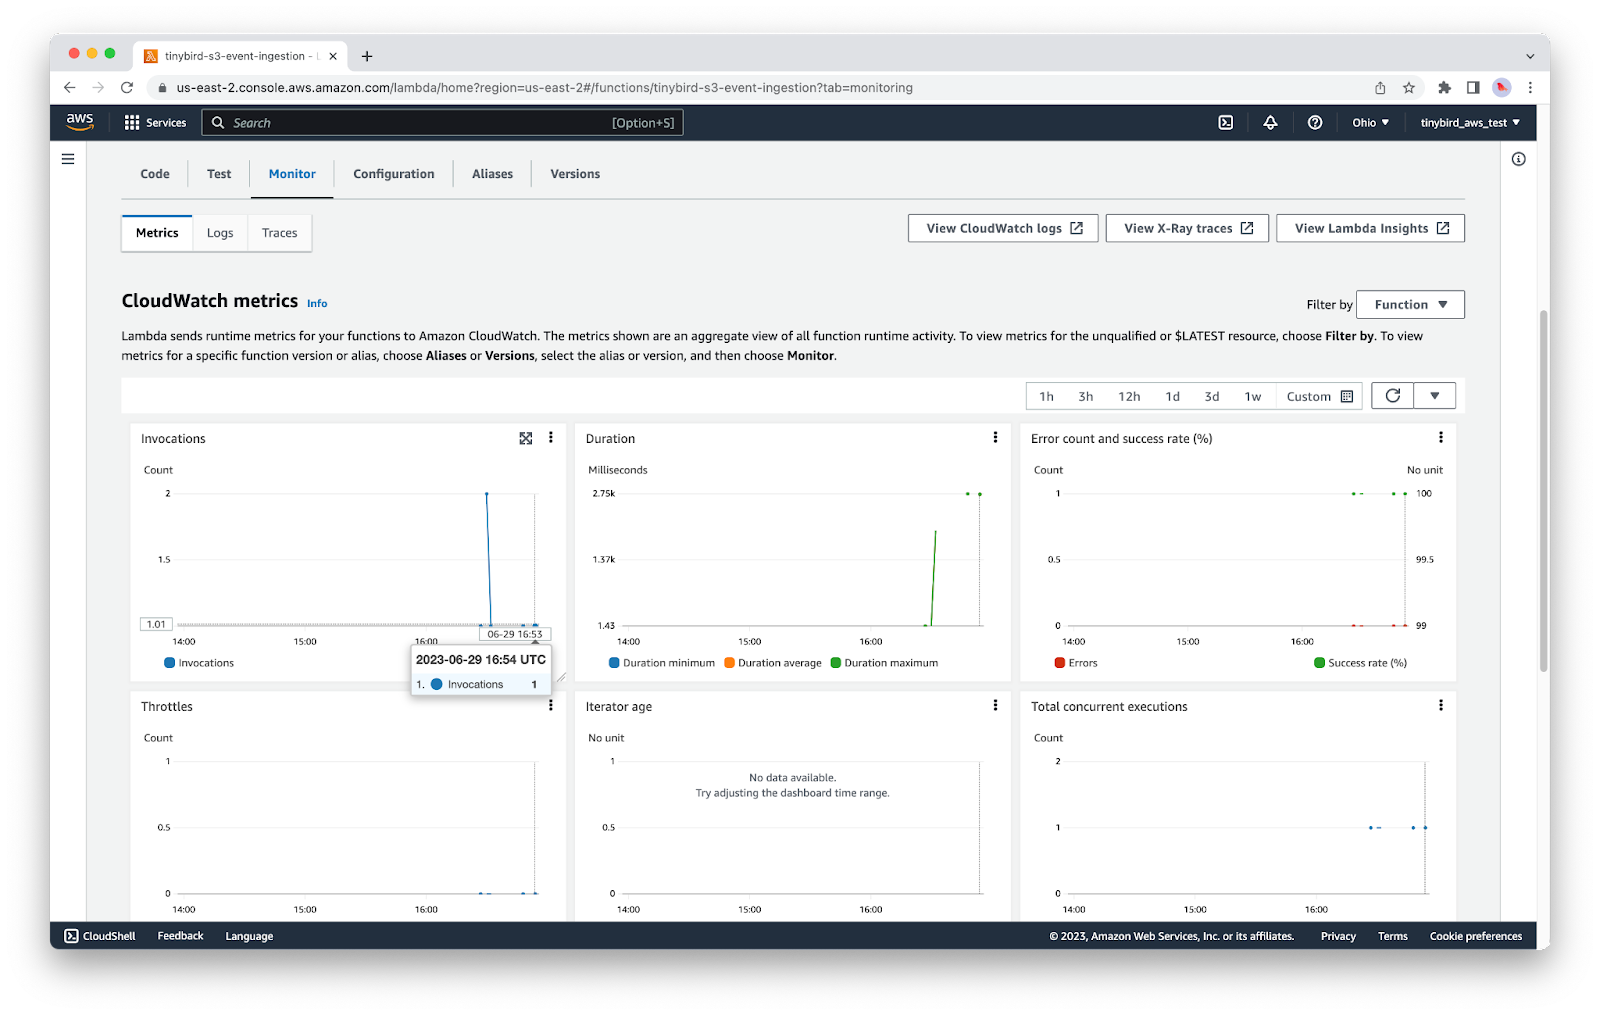
If you want to check that the Lambda was executed, return to the Lambda service, click into your function, and find the Monitor tab. CloudWatch metrics can be slow, but you will eventually see an entry to show that your Lambda was called.
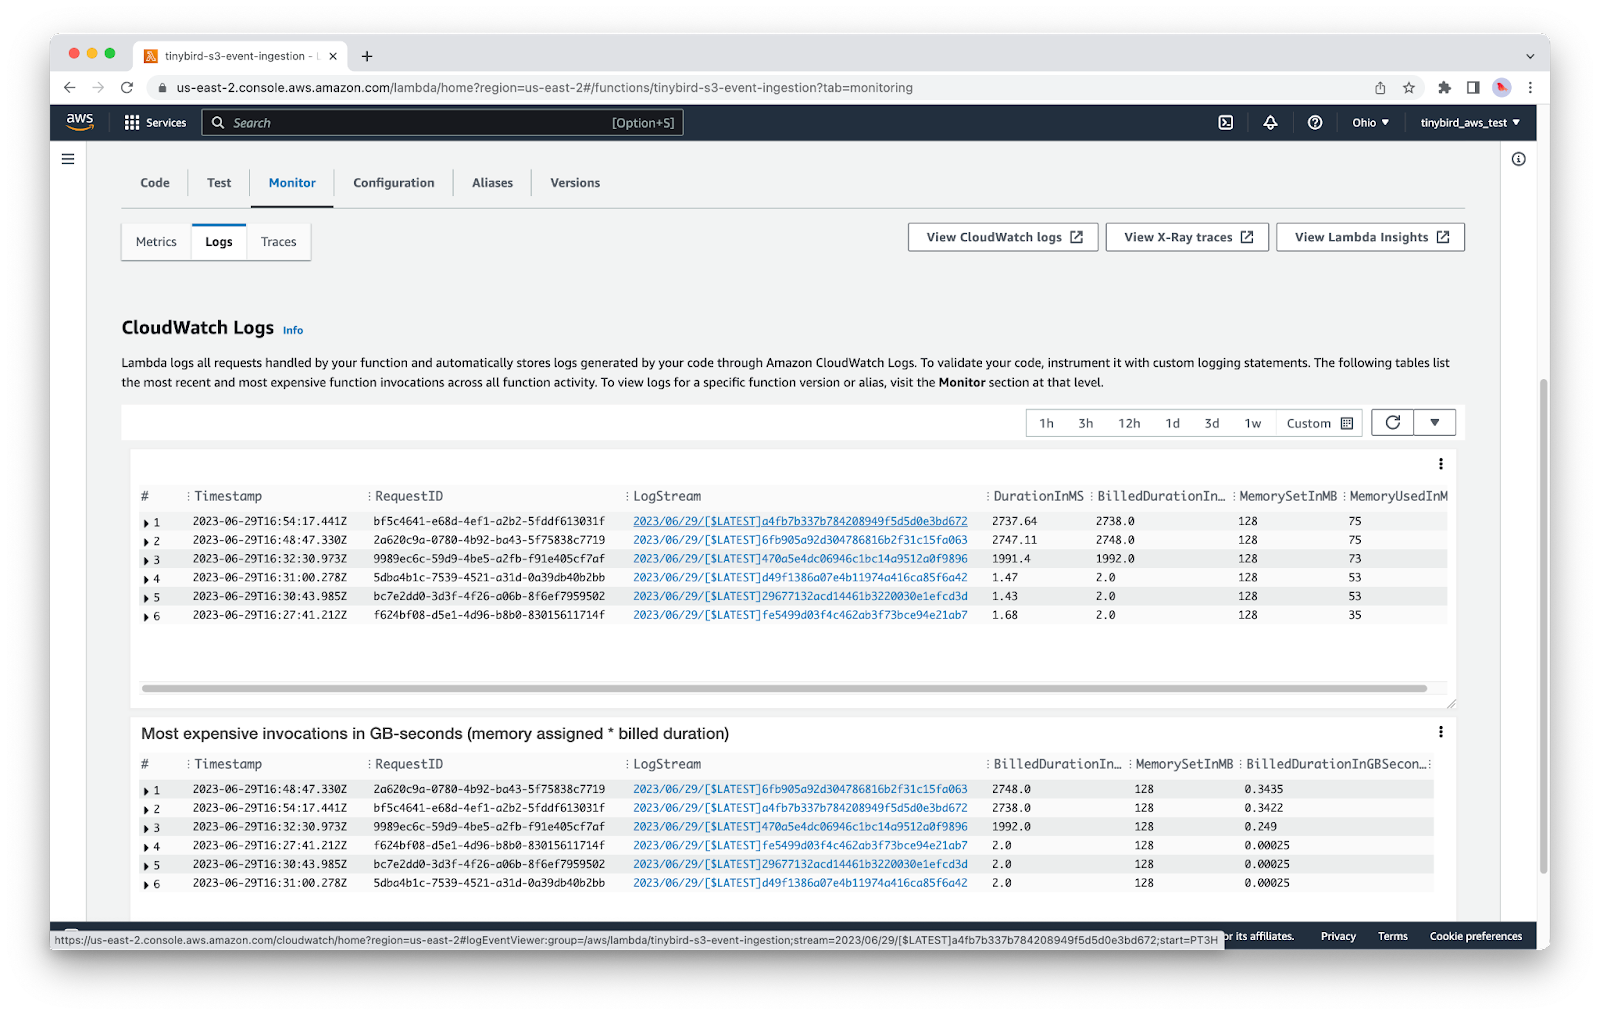
If you’re having trouble, you can always check the LogStream of your Lambda:
Conclusion
With this tutorial, I’ve shown you how to implement a cloud-native event driven architecture using object storage, event notifications, and Lambdas. There are many ways to extend this, and even different approaches for creating event-driven file ingestion. If you’re curious about using different patterns, such as those with a message queue, read this section from my last post.
For some additional resources as you work, check out the Tinybird guide for S3 ingestion and the GitHub repo containing a more complete implementation of this workflow.
If you have any questions about this tutorial, event-driven ingestion in general, or how Tinybird can help you build pipelines faster, please join our active Slack community.
Finally, if you’re curious about Tinybird, check out the docs. They’re great for familiarizing yourself with Tinybird and how it enables real-time data pipelines at scale.