Designing and implementing a weather data API


Recently, I wrote about 8 considerations for designing public data APIs based on my experience building them as a part of flood-warning systems. In that post, I highlighted what makes for a resilient and scalable API.
In this post, I’ll put those considerations into practice, designing and building a public-facing data API that serves near real-time weather conditions across 175 US cities.
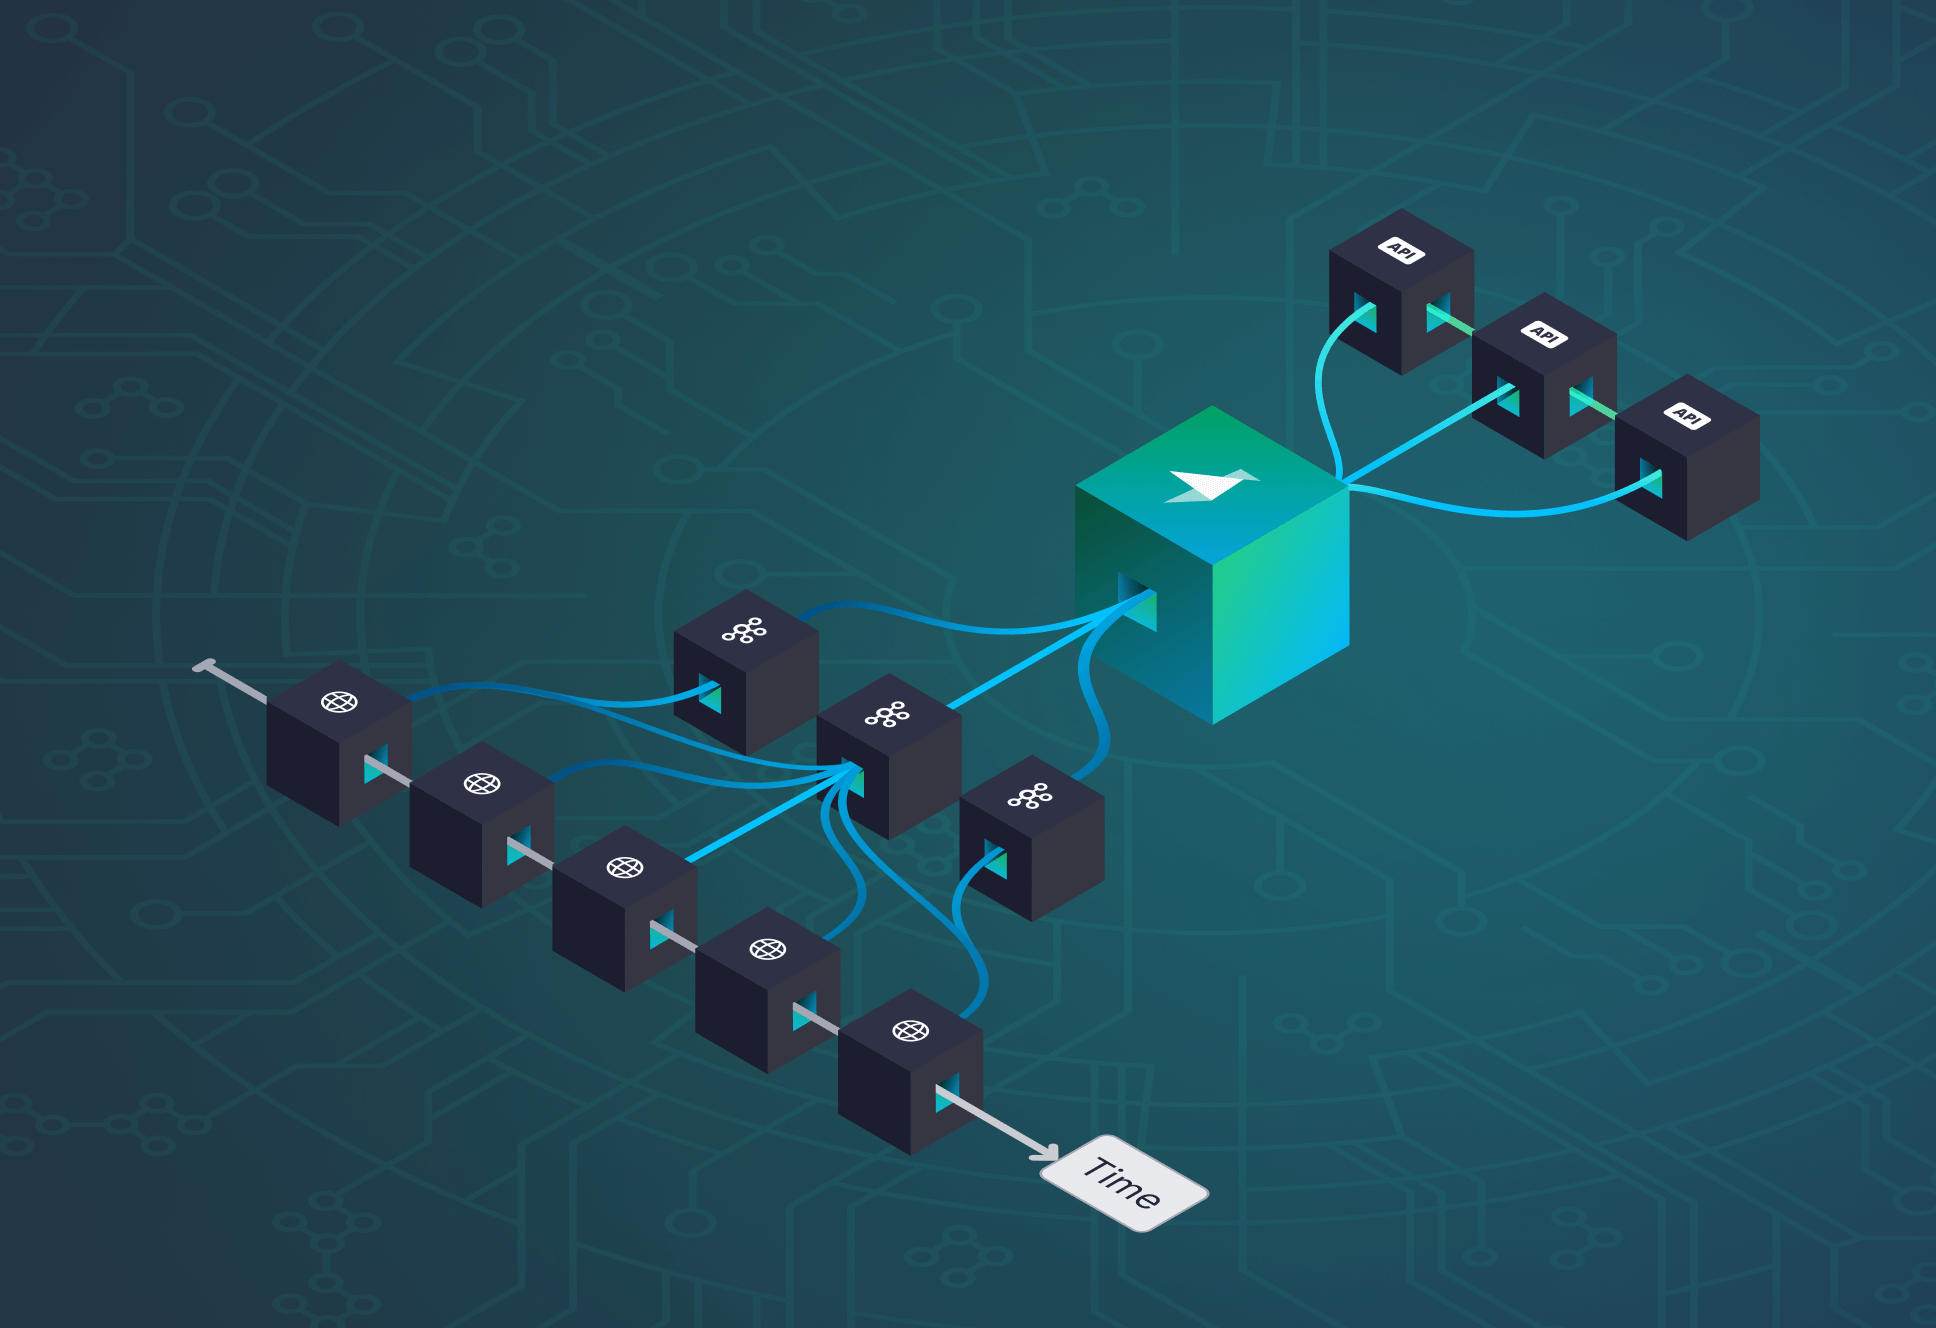
I’ll demonstrate how I captured weather data from a public source and ingested it into Tinybird so I could analyze the data and determine the best design for my API. Then, I’ll show how I developed and published the API using the core Tinybird building blocks: Data Sources and Pipes.
While this walkthrough focuses specifically on building a weather data API, the underlying themes and techniques should apply for any use case requiring a resilient, real-time data API.
Establishing a weather data feed
Tinybird is built to ingest streaming data at scale, and the first step in any Tinybird project is building Data Sources upon which to build an API. So, I needed to find a public source of weather data that I could ingest into Tinybird.
I ended up using the OpenWeatherMap Current Weather Data API, which serves weather reports from cities around the world every ~10 minutes. You can call this API and pass a city name, and it will return a “weather_data” object containing typical weather data like temperature, wind, pressure, precipitation, etc..
To capture data from the API, I wrote a Python script to automate these requests, referencing a list of 175 US Cities, and for each response generate a JSON object with this set of weather attributes:
This data object will ultimately represent the schema of the Tinybird Data Source that I used for this project. I’ll explain later how I created this Data Source, and the design factors I used to optimize performance of the API I would eventually build.
Designing the weather data API
As I mentioned in my first post, thoughtful API design should always precede implementation.
And the first step to designing any API is to decide what endpoints it should include. In this step, the data consumer and their use cases should be the focus. You must figure out what data you want to provide to those consumers, and how it should be structured.
It’s helpful to think about the data your API will serve as objects, where each object is made up of attributes. Is your use case made up of users, products, and orders? If so, you may have three endpoints that provide data pertaining to each of those types of objects.
My weather data API was designed to be simple and contain a single endpoint to return data for a ``report`` object. As I showed above, a ``report`` object includes the timestamp of its measurement along with a set of weather data types, including air temperature, precipitation, wind velocity and direction, relative humidity, barometric pressure, and percentage cloud cover.
Each ``report`` also contains a ``site_name``, indicating where the report was generated.
Since the example API Endpoint is designed to return ``report`` objects, I wanted the root URL for the endpoint was to be:
``https://api.tinybird.co/v0/pipes/reports``.
{%tip-box title="Note"%}As you’ll see below, API Endpoints created in Tinybird inherit their URL path from the Pipes they are created with. More on that later!{%tip-box-end%}
Also important when designing an API is how responses are formatted. For example, every Tinybird API Endpoint can return data in four formats, and you can select the format by indicating it in the root URL:
- ``/reports.json`` - Returns a single JSON object with reports contained in a ``data`` attribute. This format also provides a ``meta`` object that describes the returned data types, along with other information like the query execution time and the number of rows and bytes read.
- ``/reports.csv`` - Returns data weather reports in a comma-separated-values format, with a header row and one report per line.
- ``/reports.ndjson`` - Returns each report as an individual report object. This format does not include any other schema or stats metadata.
- ``/reports.parquet`` - Returns data in the Apache Parquet binary format.
Additionally, when designing API endpoints, you must consider the supported HTTP methods. In the case of data APIs created in Tinybird, which are used for retrieving data, the GET method is the focus. Compare this with the Events API that I used to ingest data, which supports the POST method for ingesting data into Tinybird.
Designing query parameters
The next step when designing a data API is determining how the responses should change based on parameters provided by the user. Will you be serving time-series data? If so, you will likely want to define query parameters to select a time period of interest.
Similarly, you will likely want to include query parameters that allow the user to filter on specific attributes of the objects in your domain.
In addition, you should consider things like limits or pagination when designing an API so that response body sizes don’t exceed any limitations.
Regardless, if you are adding query parameters to your API, you should always make sure that…
- They use consistent naming conventions
- They are well-documented
- Users know if they are required or not required
- They clearly identify acceptable data types
- Include appropriate defaults
In the documentation, you should also consider things like formatting (for ``String`` parameters) or how timezones should be handled (for ``Date`` or ``DateTime`` parameters).
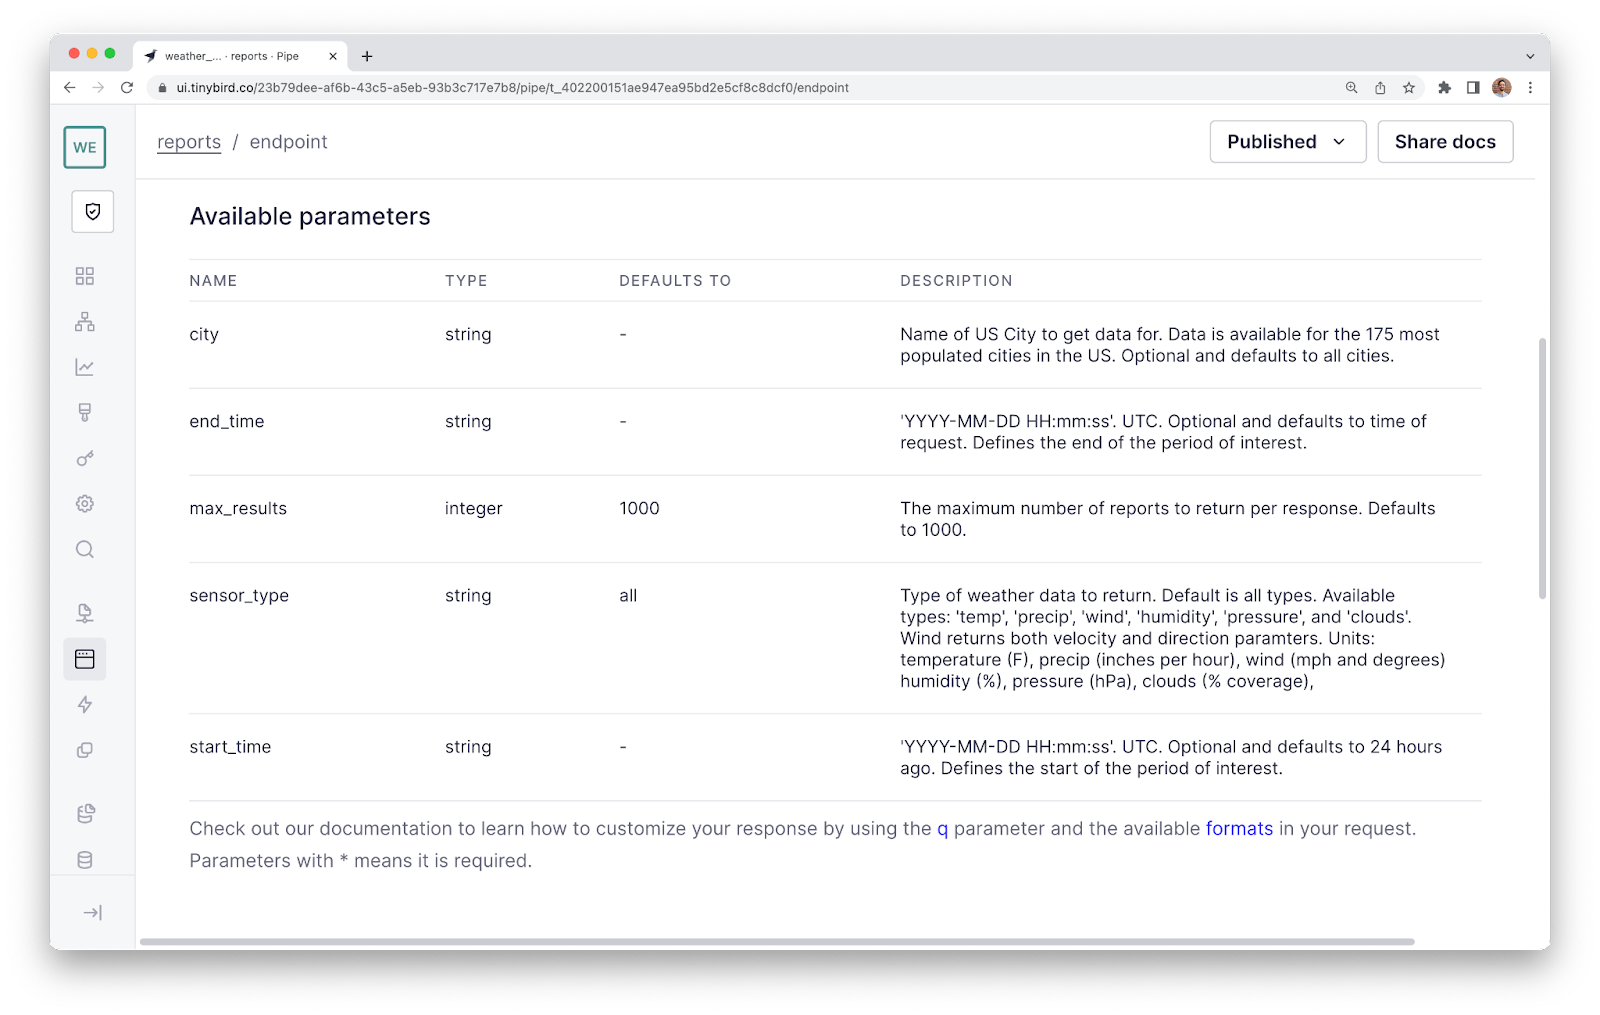
For my weather API example, I wanted users to be able to select a specific weather data type or data from a specific city over a specific time period.
Thus, my ``reports`` endpoint needed to support the following query parameters:
- ``start_time`` and ``end_time`` for defining a period of interest. Timestamps are formatted with the “YYYY-MM-DD HH:mm:ss” pattern and are in Coordinated Universal Time (UTC).
- If these request parameters are not included, the endpoint will return data from the previous 24 hours.
- If ``end_time`` is not included in the request, it defaults to the time of the request (i.e. ``now()``).
- If only an ``end_time`` is included, the ``start_time`` will default to 24 hours before the ``end_time``.
- ``city`` for selecting a single city of interest. If not included in the request, data from the entire US will be returned. Values for this parameter are case insensitive.
- ``sensor_type`` for selecting a single type of weather data to return. The following values are supported: ``temp``, ``precip``, ``wind``, ``humidity``, ``pressure``, and ``clouds``. If not used, all weather data types are reported. When ``wind`` is selected, both speed and direction are returned.
- ``max_results`` for limiting the amount of weather reports to return in the response. The default value is 1000.
Here is a preview of how these query parameters are documented in Tinybird. I’ll show you how this documentation is generated in the implementation section.
Example endpoint requests
To help illustrate how the API Endpoint should work, below are some example requests that indicate how the API might be used. The root URL path for all of these examples is ``https://api.tinybird.co/v0/pipes/``.
- Requesting the 1,000 most recent reports from all cities in the last 24 hours (the default):
``/reports.json`` which is equivalent to:
``/reports.json?max_results=1000&sensor_type=all``
- Requesting reports from the first week of June 2023:
``/reports.json?start_time=2023-06-01 00:00:00&end_time=2023-06-08 00:00:00``
- Requesting full reports from Minneapolis since yesterday::
``/reports.json?city=minneapolis``
- Requesting just temperature data since yesterday, for all cities::
``/reports.json?sensor_time=temp``
- Request the 100 most recent weather reports from across the US:
``/reports.json?max_results=100``
- Request temperature data for the city of Houston, and for June 3, 2023, midnight to midnight local time (CDT).
``/reports.json?city=houston&sensor_type=temp&start_time=2023-06-03 05:00:00&end_time=2023-06-04 05:00:00``
Here’s how I would expect the data to look in an example JSON response from the API:
Implementing the weather data API Endpoint
Before I demonstrate how I built this API, let’s talk about Tinybird. Tinybird is a real-time data platform that enables data and engineering teams to unify their data sources, develop real-time transformations with SQL, and instantly publish their data products as high-concurrency, low-latency, fully-documented, scalable APIs.
Quickly, let me provide a little “glossary of terms” on building with Tinybird. If you’re familiar with the Tinybird workflow, I encourage you to skip ahead!
The Tinybird building blocks
The "building blocks" of Tinybird can be represented by these core concepts:
- Workspaces - Workspaces help you to organize and collaborate on your Tinybird data projects. All of your Tinybird resources - including Data Sources, Pipes, Endpoints, Tokens, etc. - live in a Workspace. You can have more than one Workspace and each Workspace can have many members.
- Data Sources - Data Sources are how you ingest & store data in Tinybird. Think of a Data Source like a database table (there’s a little more detail behind it, but close enough for now). All of your data lives inside a Data Source, and you will write your SQL queries against them.
- Pipes - Pipes are where you write your SQL. You can break up Pipes into many Nodes of SQL and publish the results as APIs. When you call the API, Tinybird chains the Nodes together and returns a response.
- Nodes - Nodes are the building blocks of Pipes, and they’re effectively SQL subqueries (in the case of multi-node Pipes). When you publish a Pipe as an API endpoint, you can choose which Node to publish.
- API Endpoints - The magic of Tinybird is the ability to turn any Pipe into an API Endpoint. Build your SQL logic inside a Pipe, and then publish the result of your query as an HTTP API Endpoint. All you need to do is write the SQL, everything else is taken care of for you
{%tip-box title="Note"%}There are other important building blocks such as Auth Tokens and Organizations (for when your use case needs multiple Workspaces). All of these objects can be managed (created, updated, deleted) directly with the Tinybird UI, by using the Tinybird command-line interface (CLI), or with REST APIs for each of these objects. See our API Introduction documentation to learn more.{%tip-box-end%}
Setting up a Data Source
As I mentioned at the beginning, I had created a Python script to get data from the OpenWeatherMap API and extract the key values that I needed into a JSON object.
To create a Data Source in Tinybird, I augmented the Python script to stream the data to Tinybird using the Events API, a high-frequency ingestion HTTP endpoint that accepts JSON payloads and writes them into a Tinybird Data Source, in this case which I called ``incoming_weather_data``.
If you’d like a deeper look at how this script processes and posts data to Tinybird, you can check it out in the project’s Github repository.
One important consideration when setting up a Data Source is the underlying schema, which includes data types and sorting keys. I made sure to select appropriately sized data types to minimize storage in my Data Source.
Similarly, I defined sorting keys based on the design of my API, specifically the query parameters most likely to be used. Since every API request will filter by timestamp (even the default filters only the last 24 hours of data), I made ``timestamp`` my primary sorting key. I used ``site_name`` as the secondary sorting key, since I anticipated this would be the second-most used filter applied using query parameters.

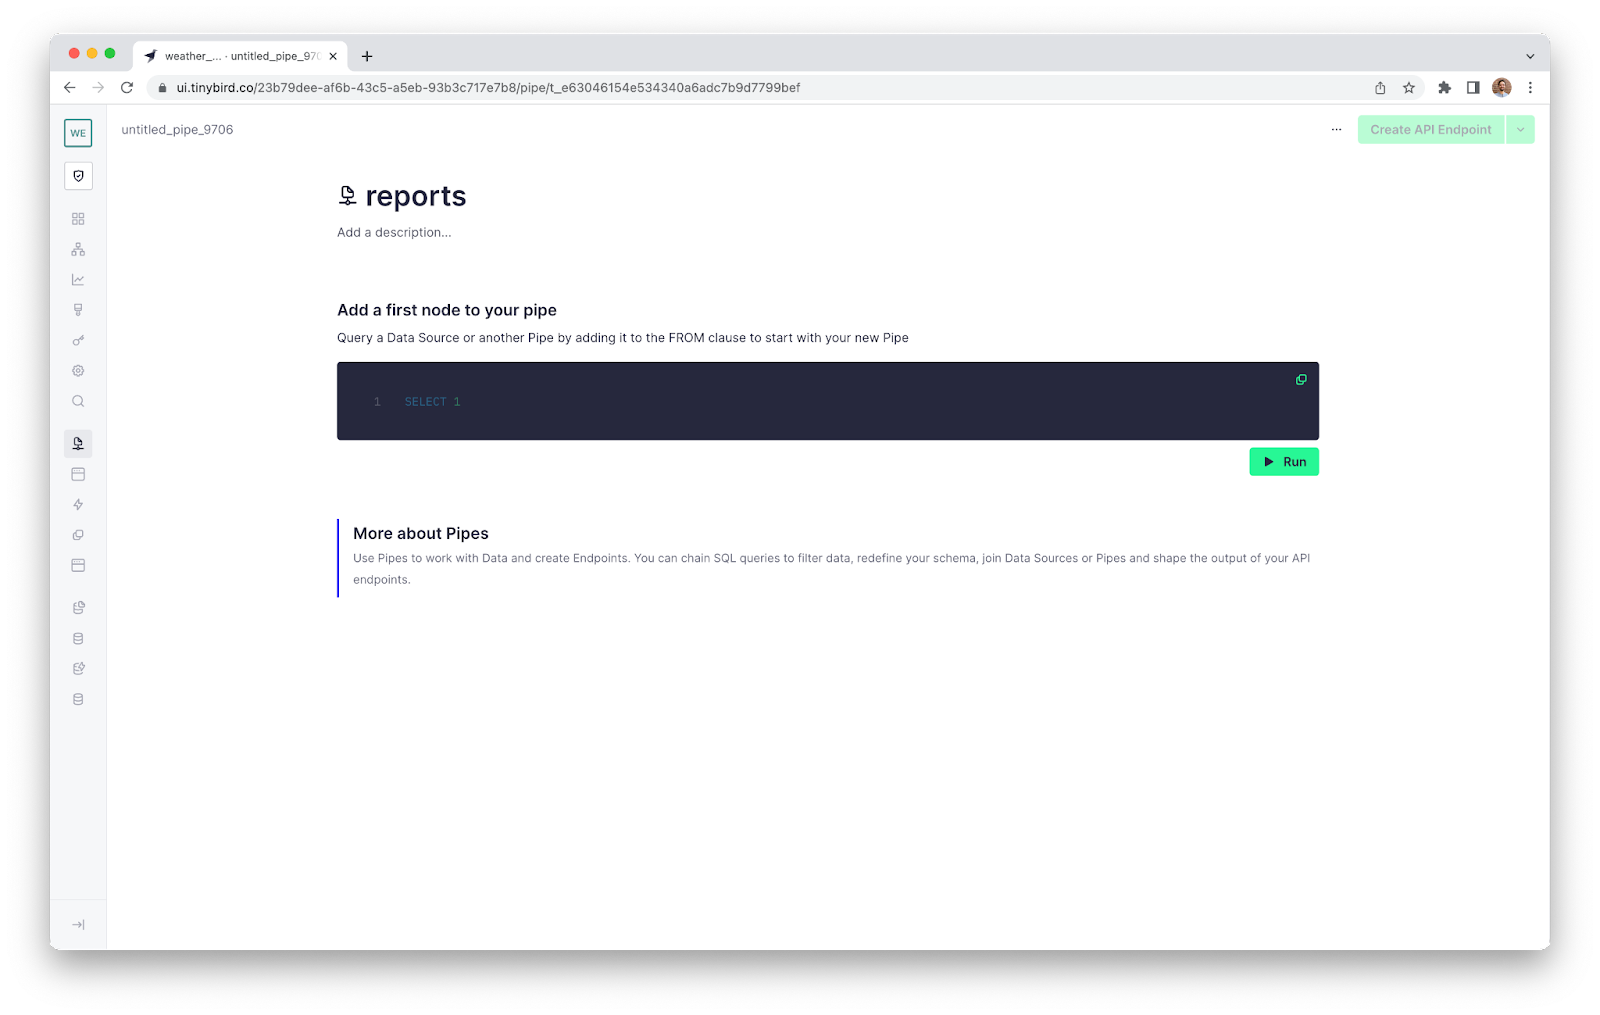
Creating the ``reports`` Pipe
Before I designed my API, I had already ingested data into Tinybird and created a Data Source called ``incoming_weather_data``. The next step, then, was to create a Pipe and build the ``report`` object I desired using SQL. Within the Pipe I could select, filter, and sort the data, as well as implement query parameters using Tinybird’s templating language.
Building with Pipes is really enjoyable, since you can break larger, more complex queries into more consumable Nodes. You can start with basic filters and iteratively generate new Nodes that build on prior Nodes. Eventually, you end up with a Node that produces the response you want your API to expose, and you can then immediately publish that Node as an API Endpoint.
This example API consists of one endpoint that returns weather reports, so I created a single empty Pipe. Since the API Endpoint will inherit the name of the Pipe from which it is published, I named the pipe ``reports``.
Implementing the API design in SQL Nodes
Now for the fun part: turning my design into an actual API by transforming the data in my Data Source with SQL and implementing query parameters. Note that to build performant APIs, you should always follow SQL best practices as we’ve described here.
Remember the schema of my ``incoming_weather_data`` Data Source looks like this:
My goal is to use SQL to transform this into the result set for my API Endpoint described above.
Based on SQL best practices, I determined that my Pipe would be best broken up into 3 nodes that incrementally process the data into a final result set:
- Node 1: Filtering by the city and time period of interest
- Node 2: Selecting the sensor report type
- Node 3: Applying the ``max results`` parameter to limit the number of report objects in the response
The first Node, which I named ``city_and_period_of_interest``, looks like this:
You’re probably wondering what all those ``%``s are doing in my SQL. That, of course, is the Tinybird templating language used to define query parameters. Before I demonstrate the final two Nodes of my Pipe, let me explain how this templating language works.
Implementing query parameters
To make a Node dynamic in Tinybird, you need to start the query with a % character. This indicates to the processing engine that it needs to parse templating syntax to generate query parameters. (Note that if you’re creating your Node in the Tinybird UI, this is done automatically).
The fundamental design of a query parameter in Tinybird looks like this:
The double curly braces indicate the use of a query parameter, the details of which are contained therein. For example, to create a query parameter for the start time, I would do this:
Note that only the data type and parameter name are actually required, but I always recommend completing the description. Each of these fields will be added to the documentation that is automatically created when you publish your API, so completeness is important.
In addition to the basic query parameter definitions, the Tinybird templating language includes more advanced logic. For instance, the ``defined()`` operator can be used within an ``if/else`` to check if a query parameter has been passed within the request.
These control operators are surrounded by ``{% %}`` characters. For example, this is how to check if the ``city`` query parameter has been passed:
To learn more about how to use query parameters and generate dynamic SQL queries, see the dynamic parameters and control operators documentation.
Finishing the reports Pipe
Now that you understand how the Tinybird templating language works to create control operators and query parameters in the context of the first Node of the Pipe, let’s move on to the subsequent nodes.
The second Node uses a multi-tiered ``if`` statement, again built with Tinybird’s templating language, to define which columns the Node will return depending on the value passed to the ``sensor_type`` query parameter.
Additionally, it demonstrates how to use a ``WITH`` statement to define the query parameter up front for brevity, which can then be referenced in the ``if/elif/else`` statements.
Finally, you’ll notice how this Node does not reference the initial Data Source (``incoming_weather_data``), but rather the result set from the first Node (``city_and_period_of_interest``).
The third and final Node of the Pipe applies a parameterized ``LIMIT`` to the result set based on the passed value for the ``max_results`` query parameter. As with the second Node, this third and final Node selects from the result set generated by the prior Node.
Note that I’ve called this Node ``endpoint`` to indicate that this is the Node I intend to publish as an API Endpoint. You don’t have to use this name, but it is a helpful convention.
With these three Nodes, all the query parameters specified in the design have been implemented, the data has been appropriately transformed to return the desired response, and the Pipe is ready to be published as an API.
Publishing the API Endpoint
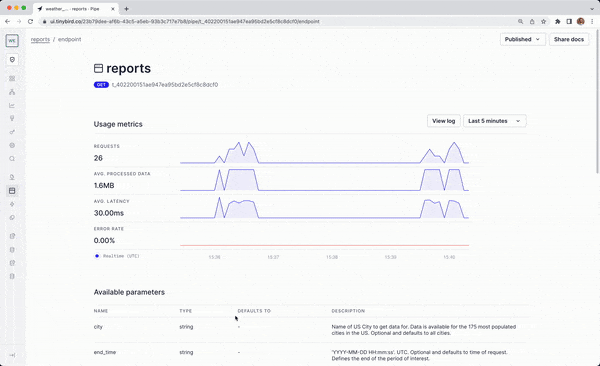
Now for the easy part. Publishing API Endpoints in Tinybird is as easy as selecting the ``reports`` Pipe and clicking “Create API Endpoint” in the upper right corner, and selecting the node you want to publish. When you select the desired Node, the API is immediately created and automatically documented.
Once the API Endpoint is published, if you click on the “View API” button, you will see a summary of usage metrics, a list of the query parameters, and a “Sample usage” section with example requests rendered in a variety of formats, including a HTTP request, Python, JavaScript, and cURL. There is also a “Share docs” button that provides links to auto-generated documentation in two versions, a Tinybird format and the OpenAPI 3.0 format.
With that, I have a production-ready API Endpoint deployed and ready to go. But before I show you the Endpoint in action, I should point out all that Tinybird supports for this endpoint:
- Documentation. I mentioned this before, but when you publish an API Endpoint in Tinybird, it will automatically create shareable documentation for your API, formatted both as a page within the Tinybird UI and a hosted OpenAPI 3.0 spec that can be used programmatically.
- Serverless Hosting. Tinybird hosts your API Endpoint, so you don’t have to worry about spinning up infrastructure.
- Data Storage. Tinybird stores the data that your API serves, so you don’t have to worry about writing any more backend code or using an ORM to interface with your database.
- Scaling. As a serverless platform, Tinybird scales to accommodate increasing demand on your API, even up to millions of requests per second (for Enterprise customers).
- Security. Tinybird is SOC II Type 2 compliant and maintains high security standards across its infrastructure. For more information about Tinybird’s security posture, visit trust.tinybird.co.
- Support. Tinybird has a responsive Slack community to help you optimize your Endpoints. This is a great place to turn if you’re getting stuck with an API that’s too slow or processing too much data. Tinybird’s staff Data Engineers are well equipped to help users optimize queries for faster, more efficient queries.
The API Endpoint in action
If you want to see my weather data API Endpoint in action, here is an example request for the ten most recent temperature reports from Denver, CO:
/reports.json?city=denver&max_results=10&sensor_type=temp
Feel free to swap out the query parameters to see how the results change.
While this project focuses on building a weather API, the techniques covered here can be applied to other use cases that require real-time data APIs. Building a real-time data API is challenging and Tinybird can simplify the process. By leveraging Tinybird's building blocks, you can focus on designing and implementing endpoints that meet the needs of your use cases.
Build your own API in Tinybird
Tinybird is an exciting new way to develop high-concurrency, low-latency APIs over large amounts of data without having to manage a complex database or write custom ORM code. The only skill you need is SQL, and you’ll be publishing APIs in no time.
New to Tinybird? Give it a try here. The Build Plan is always free, with no time limit and no credit card required. If you have any questions or get stuck, come join us in our Slack community and ask away!